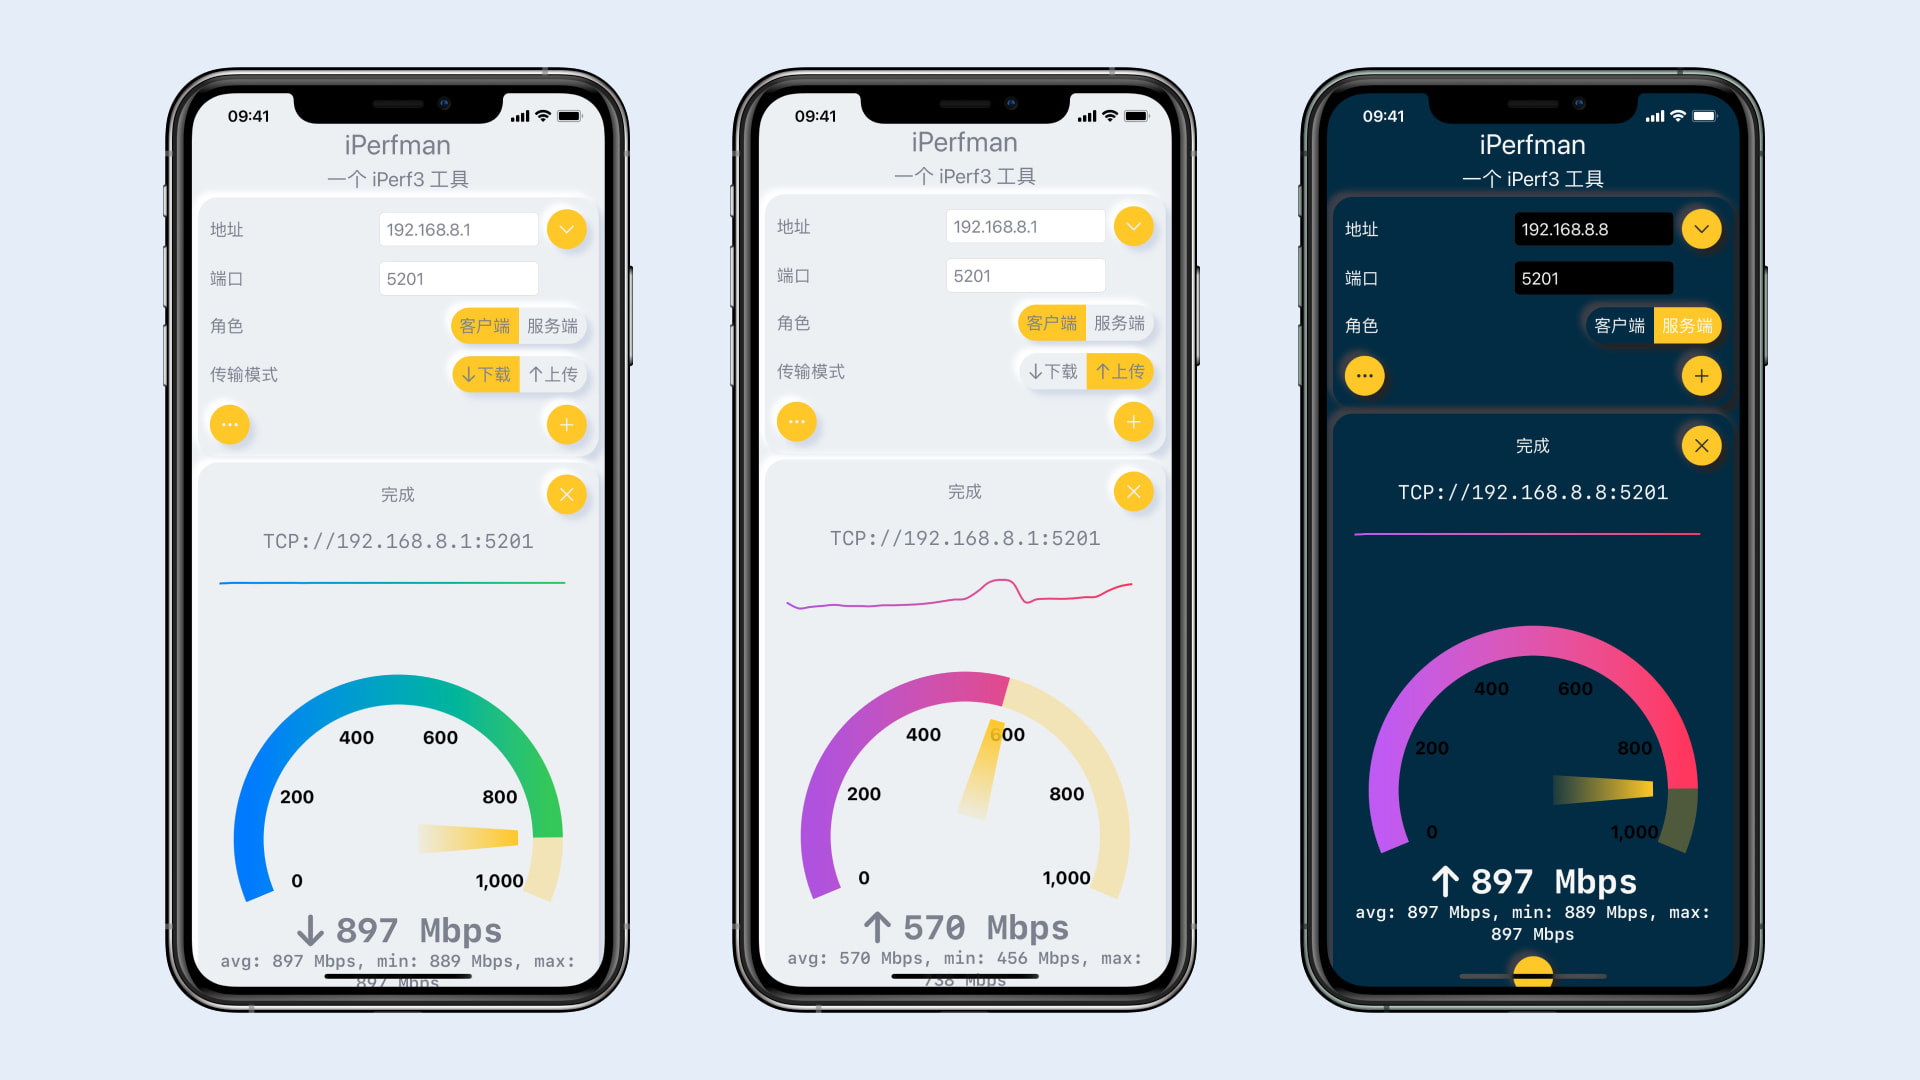
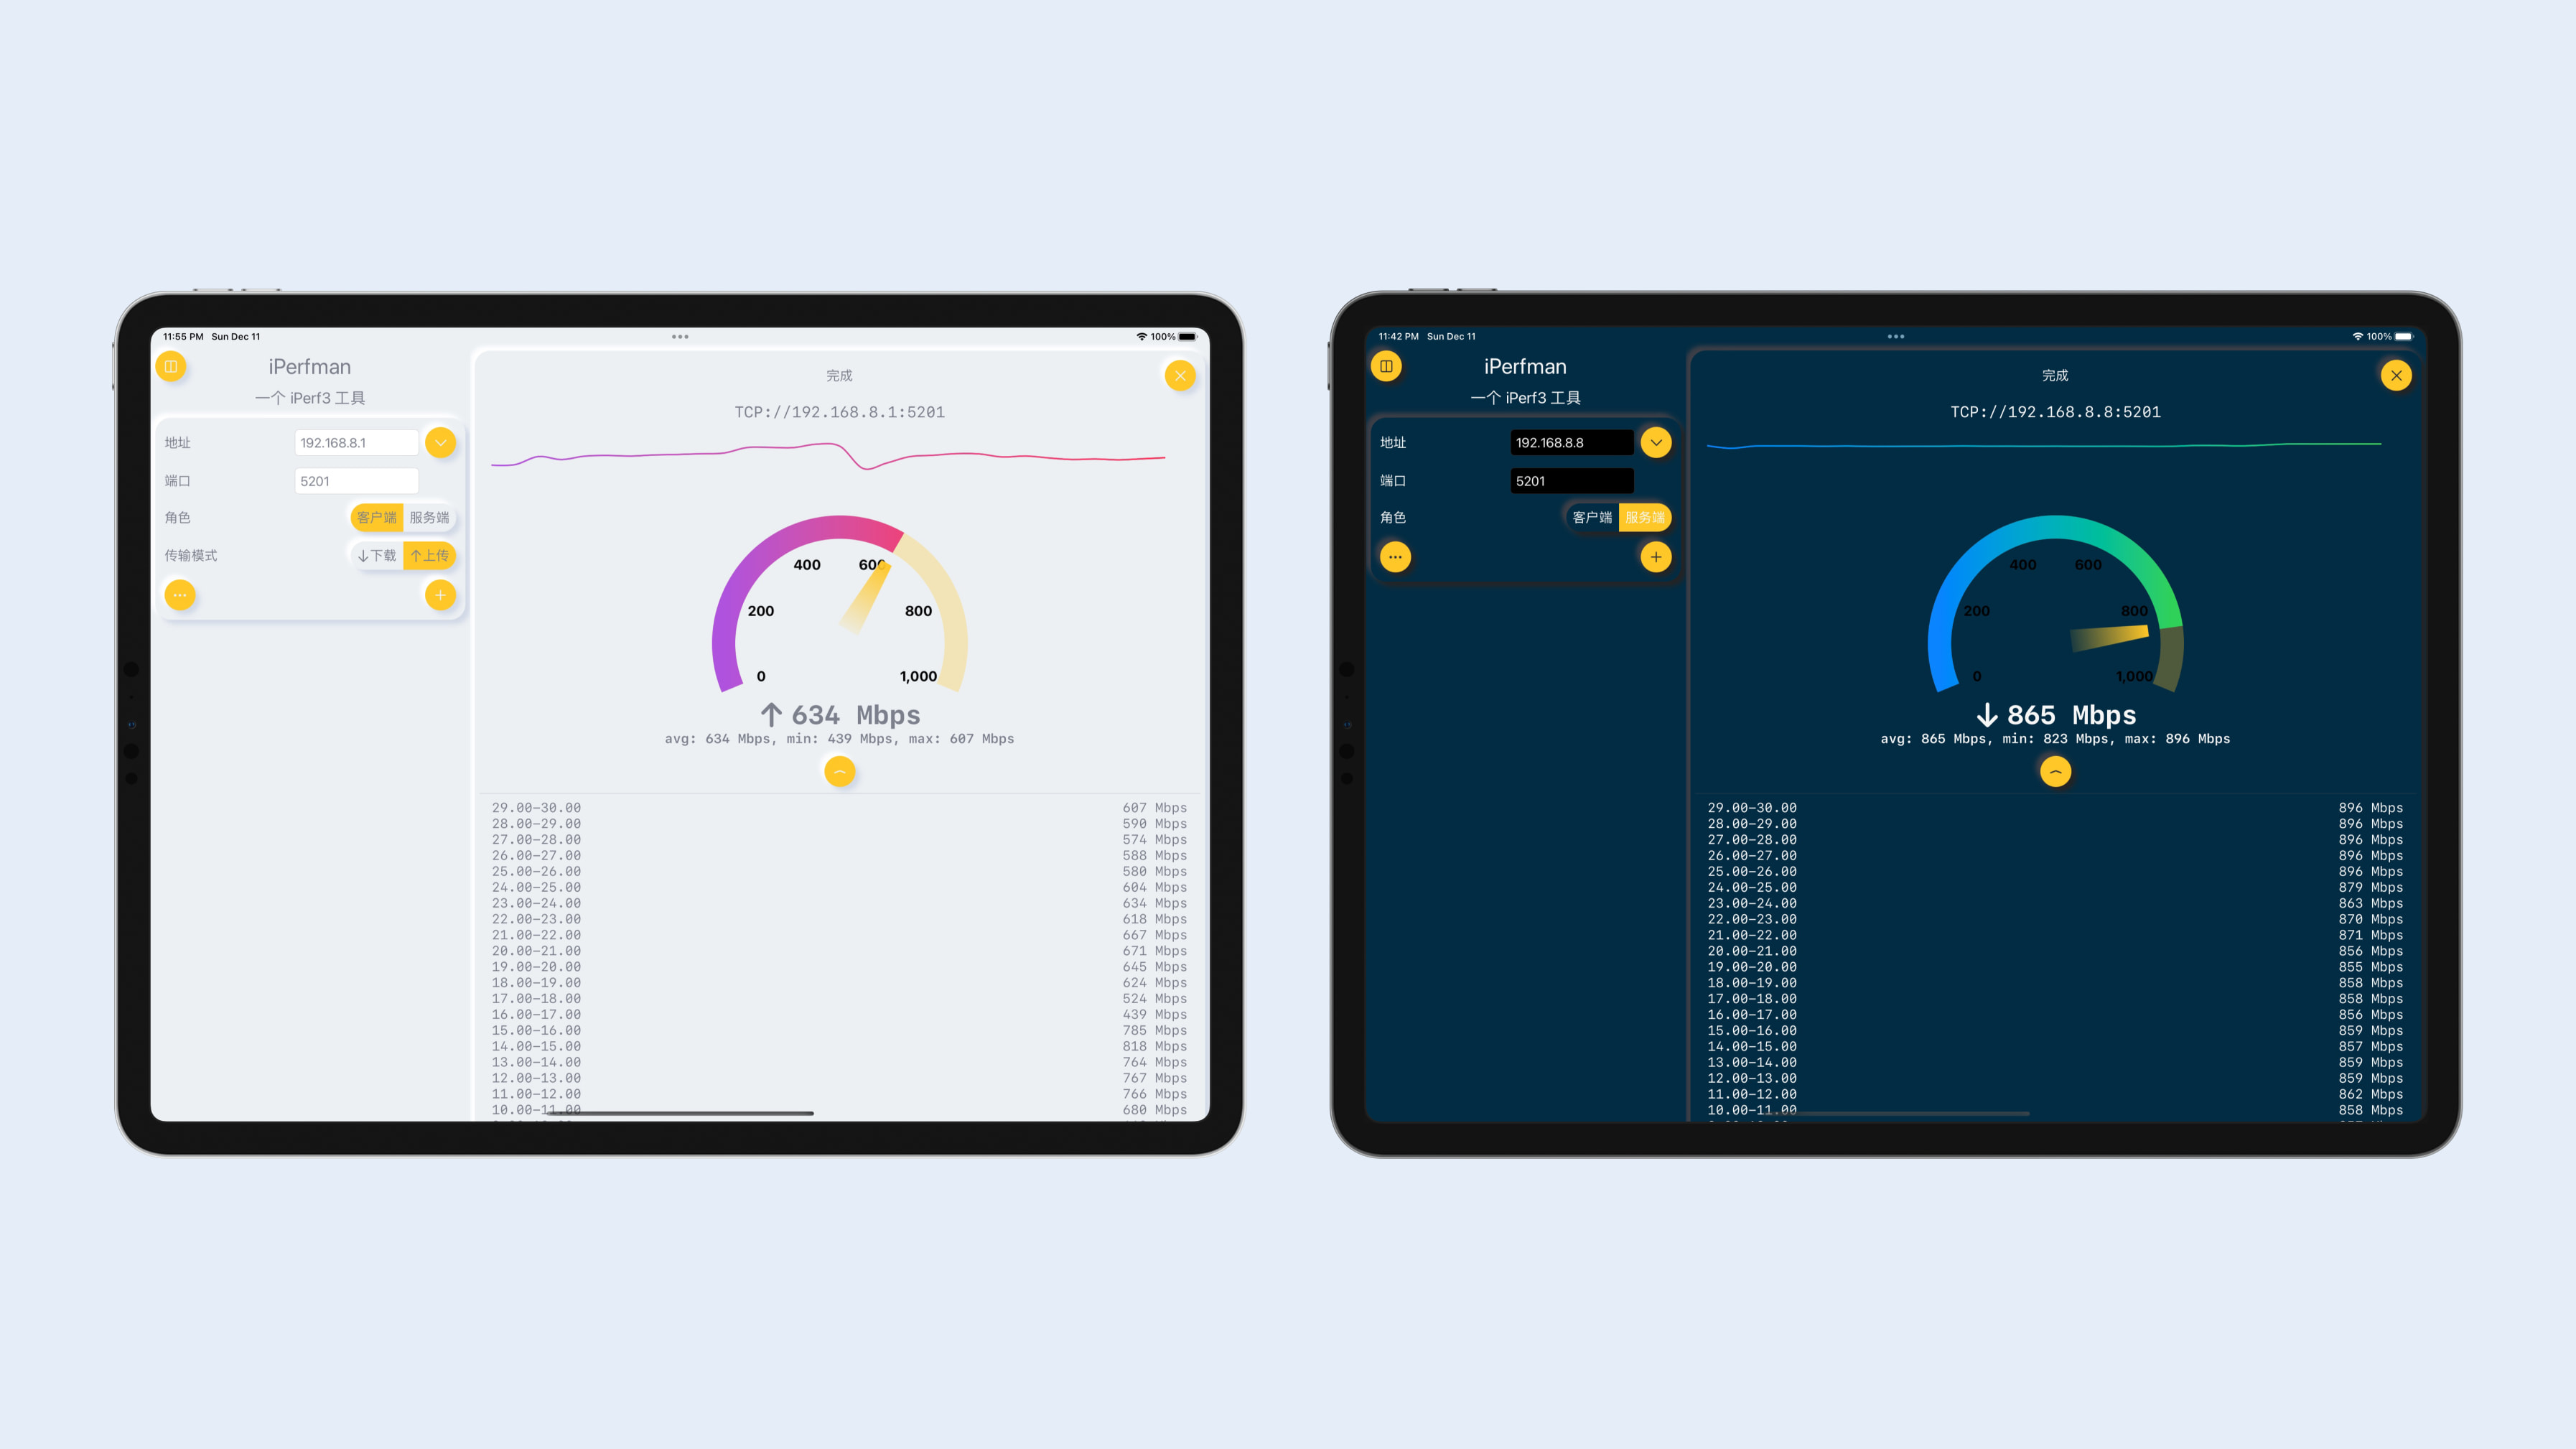
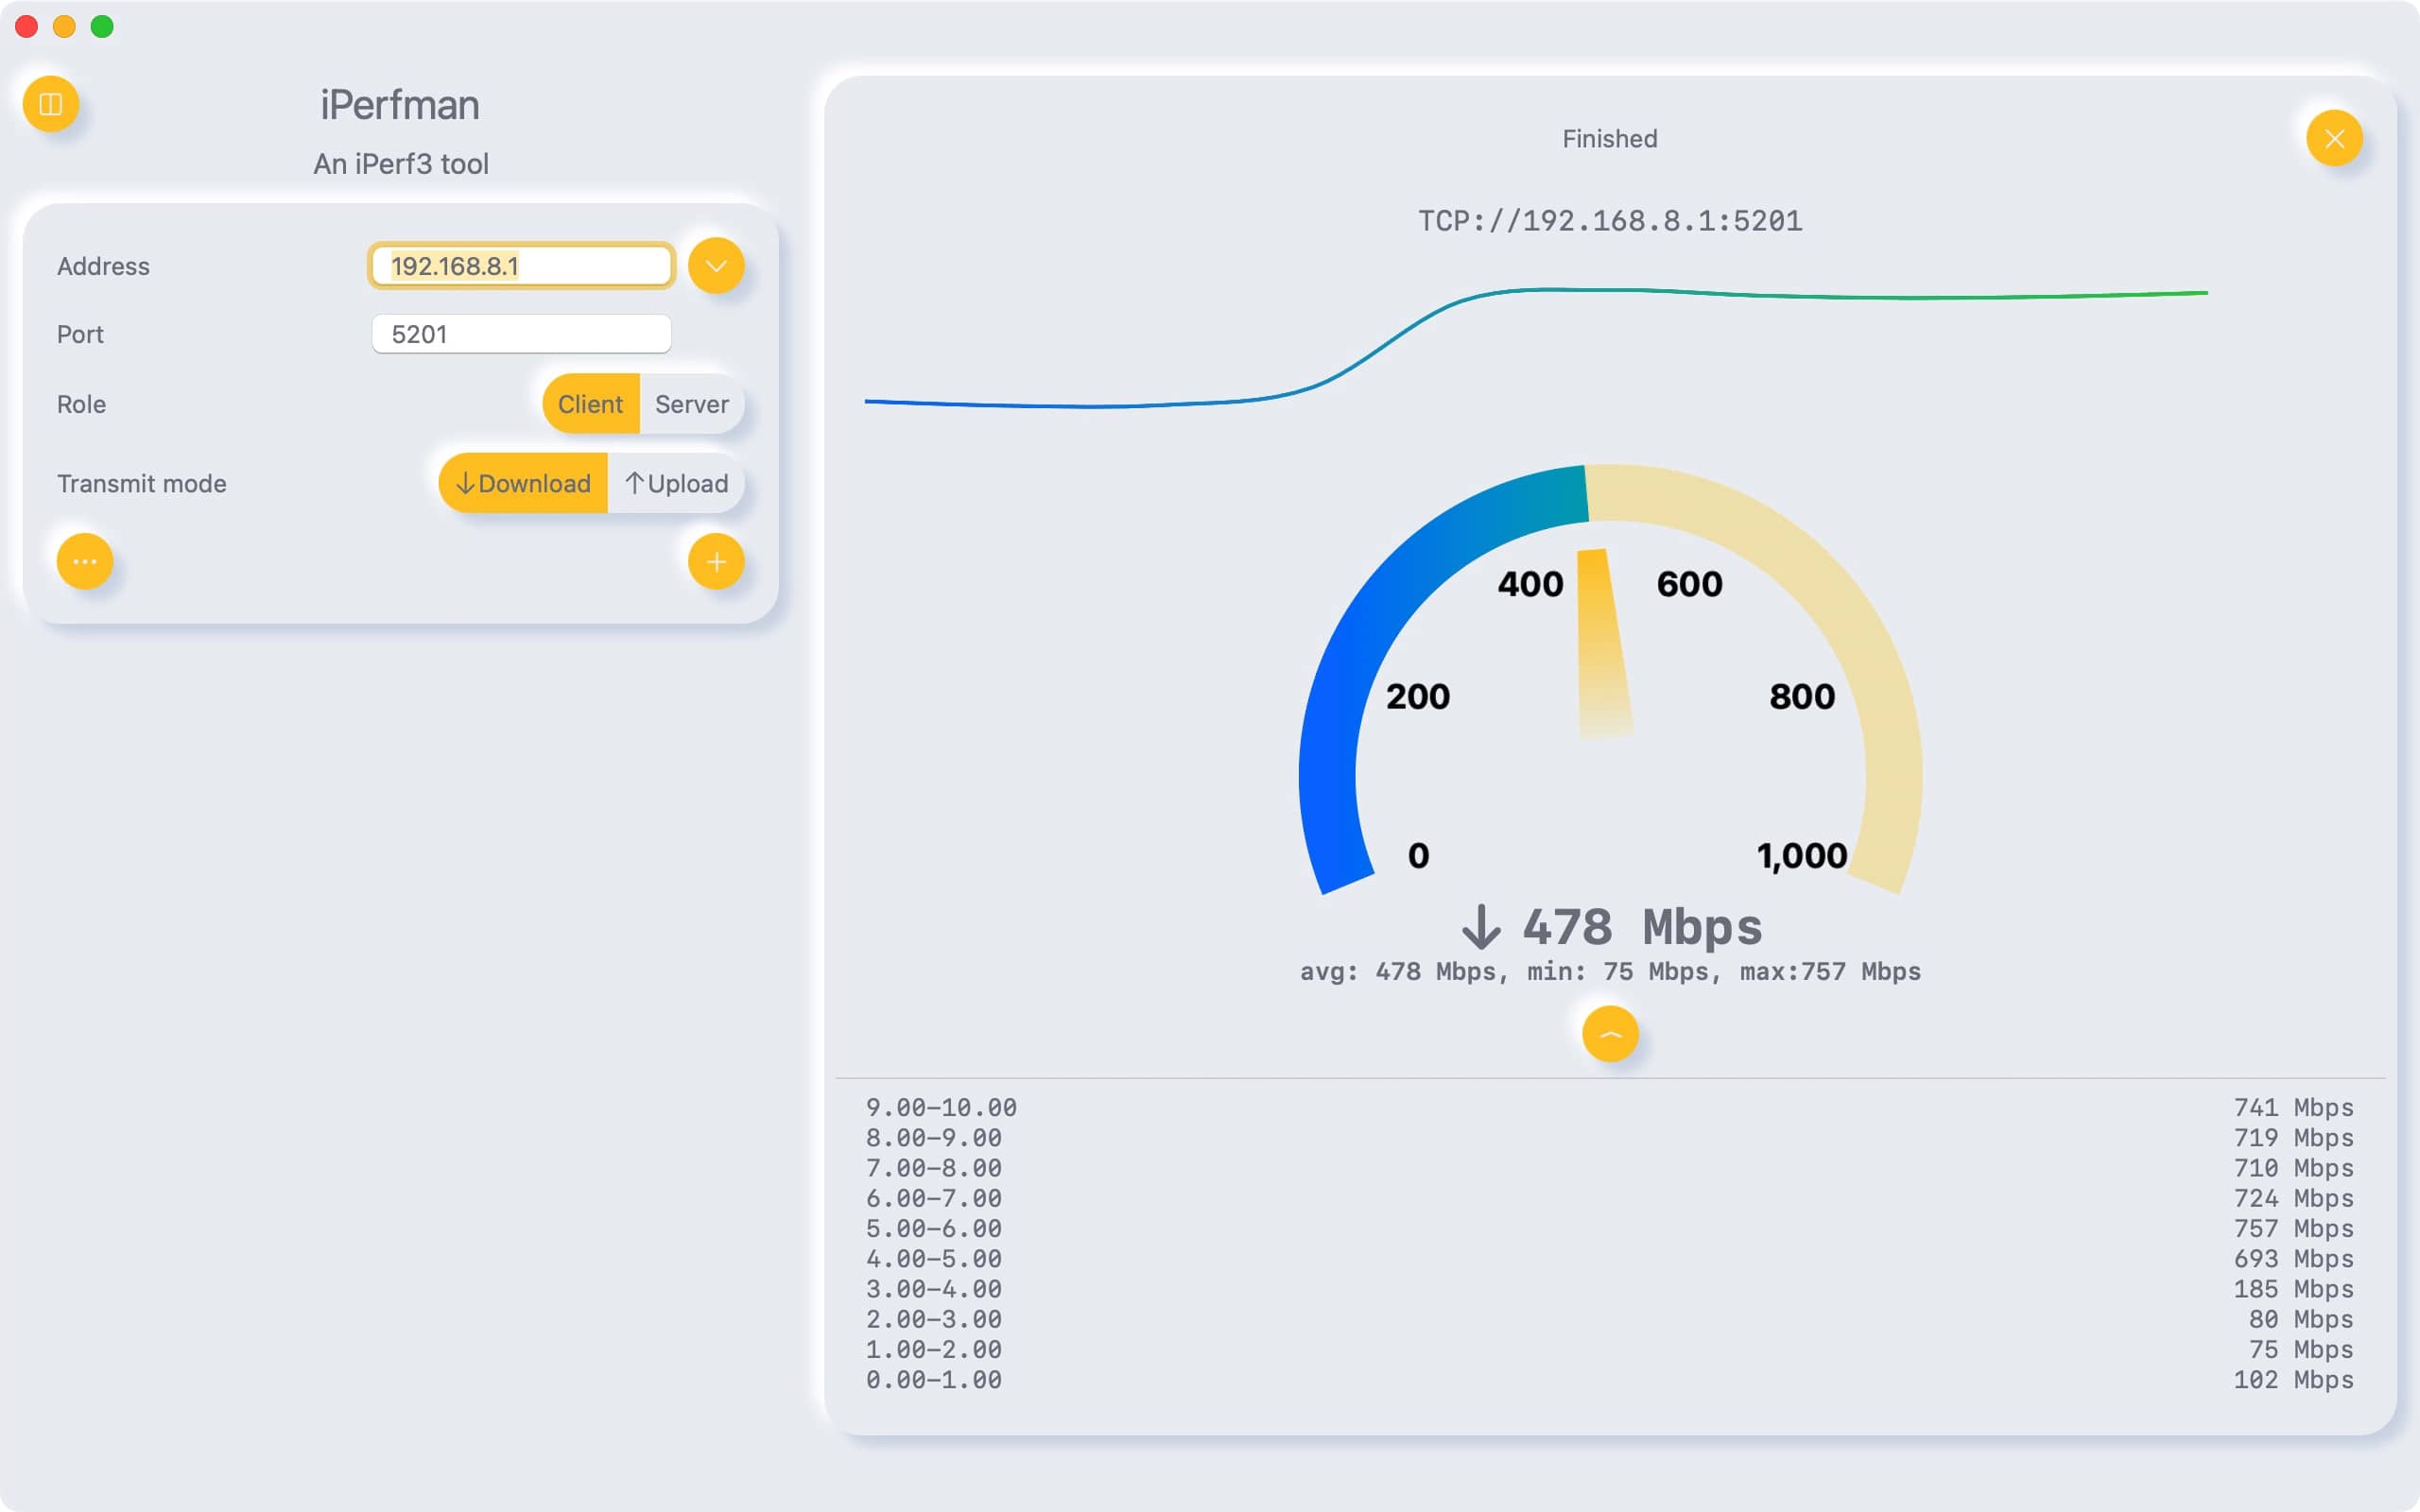
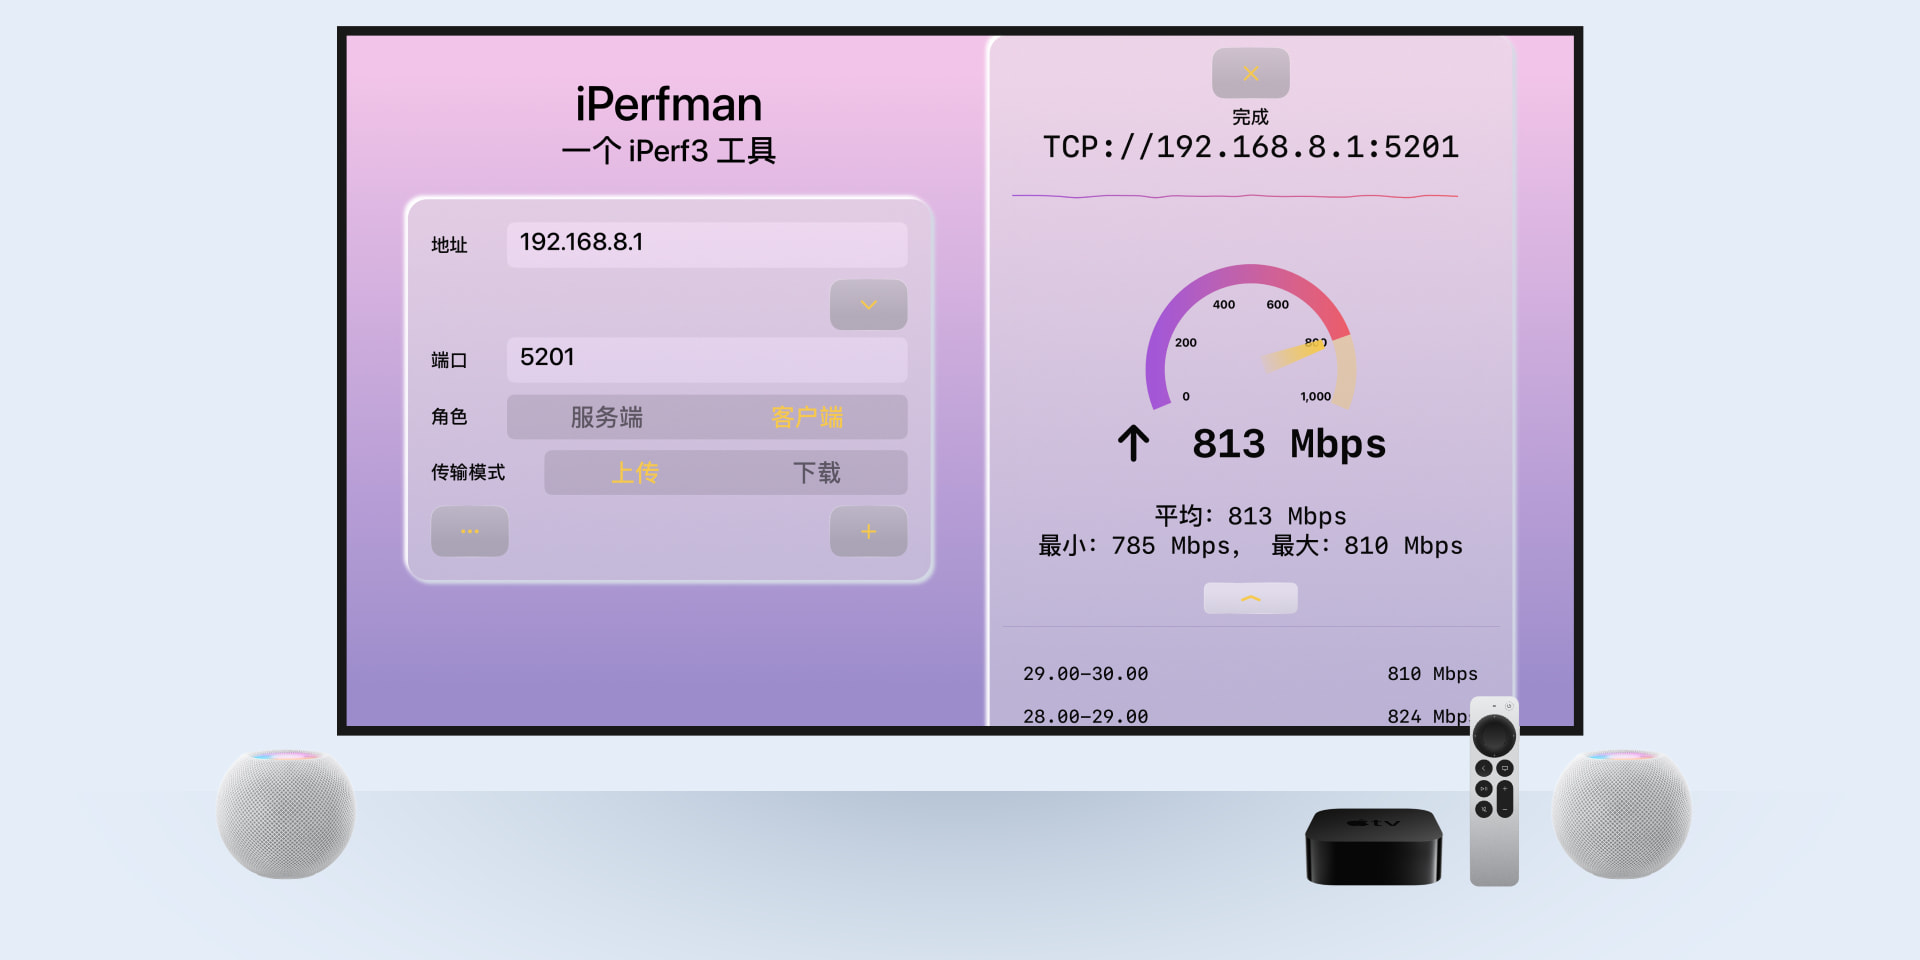
水平布局时,滚动正常,回车键也能正常退出编辑。底层是UITextField
垂直布局时,底层是UITextView,表现不一致,出现问题。

  1. 焦点问题需要我们滚动时,锚点设为顶部,proxy.scrollTo($0, anchor: .top)
  2. 回车键,退出编辑失效的问题,需要借助toolbar

完整代码如下:

1
2
3
4
5
6
7
8
9
10
11
12
13
14
15
16
17
18
19
20
21
22
23
24
25
26
27
28
29
30
31
32
33
34
35
36
37
38
39
40
41
42
43
44
45
46
47
48
49
50
51
52
53
54
import SwiftUI

struct TestNextTextFieldFocus: View {
@State var inputsValues: [String] = (0..<30).map { i in
"test \(i) TextField axis is \(i % 2 == 0 ? ".vertical" : ".horizontal")"
}

@FocusState var focusedInput: Int?

var body: some View {
ScrollViewReader { proxy in
ScrollView {
LazyVStack {
ForEach(0..<inputsValues.count, id: \.self) { i in
TextField("Value", text: $inputsValues[i], axis: i % 2 == 0 ? .vertical : .horizontal)
.focused($focusedInput, equals: i)
.submitLabel(.return)
.id(i)
.onSubmit {
print("submit \(i)")
// update state here !!
if (i + 1) < inputsValues.count {
focusedInput = i + 1
} else {
focusedInput = nil
}
}
}
}
.onChange(of: focusedInput) {
print("onChange focusedInput:\(String(describing: focusedInput))")
// react on state change here !!
proxy.scrollTo($0, anchor: .top)
}
}
.toolbar {
ToolbarItemGroup(placement: .keyboard) {
Spacer()
Button {
focusedInput = nil
} label: {
Text("Done")
}
}
}
}
}
}

struct TestNextTextFieldFocus_Previews: PreviewProvider {
static var previews: some View {
TestNextTextFieldFocus()
}
}

介绍Introducing

Mountpaper-iPhone-screenshot1
Mountpaper-iPad-screenshot1
Mountpaper-mac-screenshot1

裱纸是装裱壁纸的意思。提供许多高质量壁纸。

Mountpaper is meaning of mount wallpaper. Offer a lot of high quality wallpapers.

下载地址 Download on:App Store

有任何疑问或者建议,可以通过 Email 联系。

If you have any questions or suggestions, you can contact them through Email.

隐私政策Privacy policy

本App不进行任何隐私信息收集或上传。

This App does not collect or upload any private information.

SwiftyModel-mac-preview

介绍Introducing

使用 SwiftyJSON 生成在 Swift 语言中支持 SwiftyJSON 的 Model(模型)。

一键复制和分享代码。

Use SwiftyJSON to generate models that support SwiftyJSON in Swift Language.

One-click to copy or share code.

例如输入以下JSON:

For example, enter the following JSON:

1
2
3
4
5
6
7
8
9
10
{
"id" : 1,
"name" : "Jacky",
"notifications" : false,
"pets" : [
"cat",
"dog"
]
}

输出Swift Model:

Output Swift Model:

1
2
3
4
5
6
7
8
9
10
11
12
13
14
15
16
import Foundation
import SwiftyJSON

struct NewModel {
let id: Int
let name: String
let notifications: Bool
let pets: [String]

init(json: JSON) {
id = json["id"].intValue
name = json["name"].stringValue
notifications = json["notifications"].boolValue
pets = json["pets"].arrayValue.map { $0.stringValue }
}
}

下载地址:App Store

App Store下载
Download on the App Store

有任何疑问或者建议,可以通过 Email 联系。

If you have any questions or suggestions, you can contact them through Email.

隐私政策Privacy policy

本App不进行任何隐私信息收集或上传。

This App does not collect or upload any private information.

subscriptions-mac-preview

介绍

  1. 轻松记录全部订阅账单。

  2. 统计平均每日、每周、每月和每年花费。

  3. 支持iCloud同步全设备。

下载地址:App Store

有任何疑问或者建议,可以通过 Email 联系。

隐私政策

本隐私政策描述了我们如何收集,使用和披露与服务有关的个人信息,您通过访问服务即表示同意。“个人信息”是指有关可识别个人的信息,但不包括商业信息。

收集哪些信息

阅账希望使您与我们的体验令人满意且安全。我们的数据收集政策使您可以选择向我们提供多少个人信息,并控制我们如何使用这些信息。我们的目标是为您提供满意的体验,同时让您控制自己的隐私。阅账收集和使用信息主要是为了使您使用我们的服务更轻松,更有意义。如果您选择向我们注册,则可能会在不同时间要求您提供信息,我们将竭尽所能使阅账满足您的服务并只为您提供所需的内容。

收集的信息与用途

为识别您的设备 ID 并预防恶意程序、提高服务安全性、保障运营质量及效率,我们使用的第三方平台包括Firebase 会收集您的设备信息(包括IMEI、MEID、IMSI、GUID、MAC地址)、您安装的应用信息或运行中的进程信息。

匿名信息是指无法与特定个人联系在一起的信息,我们不知道您的姓名,住处或出生日期。匿名信息可能以多种方式收集,包括通过使用 Cookie,网络信标或从您使用的设备中收集。

第三方分析工具

我们的服务可能包含来自我们服务提供商的第三方跟踪以及数据收集和分析工具,例如 Google Analytics(分析)和 Google Firebase 。此类第三方可以在我们的服务中使用 Cookie,API 和 SDK,以使他们能够代表我们收集和分析与用户和设备相关的数据和信息。第三方可能会访问并收集有关您的数据和信息,例如您的设备标识符(包括IMEI、MEID、IMSI、GUID、MAC地址及其他相关信息),语言环境(使用特定语言的特定位置),地理位置信息,IP 地址,应用程序使用情况,访问权限和会话时间,传感器数据,设备上存在的或在设备上特定时间使用的应用程序以及您对广告的观看和互动,以提供其服务,包括例如启用,提供和投放广告在下面有更详细的说明。

我们的服务提供商的隐私政策可能包括有关其数据收集和使用惯例以及跟踪技术的其他条款和披露,我们鼓励您检查这些隐私政策以了解有关其数据收集和使用惯例以及 Cookie 的使用的更多信息以及其他类似的跟踪技术。

为识别您的设备 ID 并预防恶意程序、提高服务安全性、保障运营质量及效率,我们使用的第三方平台将获取设备序列号。

第三方广告合作伙伴

我们与各种广告商,广告网络,广告服务器和分析公司合作。这些广告商,广告网络,广告服务器和分析公司使用各种技术以及第三方公司的技术来收集数据,以便向您和其他用户发送(或投放)相关广告。这些技术可能包括放置Cookie或网络信标,使用唯一或非唯一的非个人标识符,或在我们的服务上使用其他技术,并且这些技术可用于跟踪用户行为,跟踪我们如何服务正在使用中,有可能为您提供更多相关的广告。这些目标广告可能会出现在我们的服务或您访问的其他服务上。本隐私政策不涵盖广告商,广告网络,广告服务器和分析公司对各种技术的使用。这些公司还可能从您从其他公司使用的服务中获取信息,这些服务包括但不限于其他网站,移动网站,可移动下载的应用程序和可下载的桌面应用程序,并将这些信息与他们通过我们的服务通过这些第三方技术获取的信息结合在一起。您应该意识到,我们无法控制这些第三方技术或其中包含的信息。

更新

阅账可以随时修改本隐私政策。请经常检查是否有任何更改。继续使用服务,即表示您接受本隐私政策的所有更新。此版本于 2023 年 02 月 01 日更新。

联系我们

我们希望此声明能为您提供丰富而清晰的信息。如果您有任何疑问或进一步的信息,请给我们发送电子邮件。

App 与服务反馈: 531sunlight@gmail.com

机器配置

主板:微星 MSI MPG Z390 GAMING PRO CARBON AC

CPU:Intel i9 9900K

内存:科赋 DDR4 3200 16G*4

显卡:华硕 ASUS AREZ-STRIX-RXVEGA64-O8G-GAMING

电源:EVGA SuperNOVA 750 G+

散热:MASTERLIQUID ML240R RGB

固态:三星 970 EVO 500G

板载声卡:ALC S1220A

板载有线网卡:Intel I219V7

无线网卡和蓝牙:BCM94360CD

显示器:戴尔 P2715Q 4K显示器

机箱:追风者 PK-515ETG

具体步骤

  1. 替换Clover为Open Core v0.6.2,感谢 pOH7/hackintosh-z390-h-9700kuzh 的EFI。
  2. 下载并升级Big Sur,重启几次后,无法进入Big Sur的安装界面。
  3. 升级Open Core v0.6.3,感谢 Ryzentosh Big Sur Updating OpenCore From 0.6.2 to 0.6.3
    1. 打开OpenCore Sanity Checker ,拖进config.plist,根据建议修改。
    2. 下载OpenCorePkgWhateverGreenVirtualSMCLilu 并替换。其中OpenCore只需要替换EFI/OC/OpenCore.efiEFI/BOOT/BOOTx64.efi
  4. 顺利进入Big Sur的安装界面,升级成功🎉
  5. EFI下载地址: [Big Sur Open Core 0.6.3 EFI 20201114.zip](https://github.com/gewill/Hackintosh-Installation-with-MSI-Z390-and-i9-9900K/blob/master/Big Sur Open Core 0.6.3 EFI 20201114.zip)

Hackintosh-Big-Sur

已知问题

  1. USB 2.0 不可用,需USB定制。
  2. 硬件加速不可用,BIOS集成显卡打开即可硬件加速。

Hardware-Acceleration-On-Big-Sur

Array.swift

Using a negative number or an index equal to or greater than count triggers a runtime error.

使用负数或大于等于count的索引会触发运行时错误。

1
print(emptyDoubles[0])

ClosedRange.swift

An equivalent range must be representable as a closed range. For example, passing an empty range as other triggers a runtime error, because an empty range cannot be represented by a closed range instance.

等效范围必须可以表示为闭合范围。例如,将空范围作为 other 传递会触发运行时错误,因为空范围不能由封闭范围实例表示。

1
2
let emptyRange = 0..<0
ClosedRange(emptyRange)

Dictionary.swift

Passing a sequence with duplicate keys to this initializer results in a runtime error. If your sequence might have duplicate keys, use the Dictionary(_:uniquingKeysWith:) initializer instead.

向此构造器传递具有重复键的序列会导致运行时错误。如果序列可能有重复的键,则使用Dictionary(_:uniquingKeysWith:) 初始化。

1
2
3
let digitWords = ["one", "two", "three", "four", "five"]
let wordToValue = Dictionary(uniqueKeysWithValues: zip(digitWords, 1 ... 5))
let wordToValueAndRemoveDuplicateKeys = Dictionary(zip(["one", "one", "three", "four", "five"], 1 ... 5)) { max($0, $1) }

DictionaryCasting.swift

1
2
var dic: [String: Any] = ["name": "li", "age": 18]
dic as! [String: String]

Integers.swift

When the additive inverse of a value is unrepresentable in a conforming type, the operation should either trap or return an exceptional value. For example, using the negation operator (prefix -) with Int.min results in a runtime error.

当一个值的负值在一个符合类型中不可表示时,操作应该捕获或返回一个异常值。例如,将否定运算符(前缀-)与 Int.min一起使用会导致运行时错误。

1
2
3
4
5
6
7
8
9
10
11
12
13
let x = Int.min
let y = -x
// Overflow error

let z = -Int8.min
// Overflow error

var y = Int8.min
y.negate()
// Overflow error

let z = UInt32(-500)
// Error

Optional.swift

In debug builds (-Onone), the unsafelyUnwrapped property has the same behavior as using the postfix ! operator and triggers a runtime error if the instance is nil.

在调试版本(-Onone)中,unsafelyUnwrapped属性的行为与使用后缀的行为相同!如果实例为 nil ,则触发运行时错误。谨慎使用

1
2
3
let optionalInt: Int? = nil
optionalInt.unsafelyUnwrapped
optionalInt!

Policy.swift

If you have prior knowledge that an AnyObject instance has a particular type, you can use the unconditional downcast operator (as!). Performing an invalid cast triggers a runtime error.

如果您事先知道AnyObject实例具有特定的类型,则可以使用无条件向下转换运算符(as)。 执行无效强制转换会触发运行时错误。

1
2
3
4
5
let message = s as! String
print("Successful cast to String: \(message)")
// Prints "Successful cast to String: This is a bridged string."
let badCase = v as! String
// Runtime error

Range.swift

An equivalent range must be representable as an instance of Range. For example, passing a closed range with an upper bound of Int.max triggers a runtime error, because the resulting half-open range would require an upper bound of Int.max + 1, which is not representable as

范围边界值越界会触发运行时错误,如设置最大值为Int.max时。

1
Range(0 ... Int.max)

Always use the slice’s startIndex property instead of assuming that its indices start at a particular value. Attempting to access an element by using an index outside the bounds of the slice’s indices may result in a runtime error, even if that index is valid for the original collection.

始终使用 slice 的startIndex属性,而不是假设它的索引以特定的值开始。试图通过在slice索引的边界之外使用索引来访问元素可能会导致运行时错误,即使该索引对原始集合有效。

1
2
3
4
5
6
7
8
9
10
11
let streets = ["Adams", "Bryant", "Channing", "Douglas", "Evarts"]
let streetsSlice = streets[2...]
print(streetsSlice)
// ["Channing", "Douglas", "Evarts"]

print(streetsSlice.startIndex)
// 2
print(streetsSlice[2])
// "Channing"
print(streetsSlice[0])
// error: Index out of bounds

RangeReplaceableCollection.swift

Attempting to remove more elements than exist in the collection triggers a runtime error.

尝试移除集合中存在的元素数目多于存在的元素会触发运行时错误。

1
2
3
var array = Array(0 ..< 5)
array.removeFirst(6)
array.removeLast(6)

SetCasting.swift

We can’t just delegate to _setDownCastConditional here because we rely on as! to generate nice runtime errors when the downcast fails.

Set 向下强制转换失败时,会产生运行时错误。

1
2
var s: Set<AnyHashable> = [1, 2, "3"]
s as! Set<Int>

StaticString.swift

1
2
3
4
5
6
7
8
9
10
11
// * a pointer to a null-terminated sequence of UTF-8 code units:
let emoji: StaticString = "\u{1F600}"
emoji.hasPointerRepresentation // -> true
emoji.isASCII // -> false
// emoji.unicodeScalar // -> Fatal error!
emoji.utf8CodeUnitCount // -> 4
emoji.utf8Start[0] // -> 0xF0
emoji.utf8Start[1] // -> 0x9F
emoji.utf8Start[2] // -> 0x98
emoji.utf8Start[3] // -> 0x80
emoji.utf8Start[4] // -> 0x00
1
2
3
4
5
6
7
8
9
10
11
12
13
14
15
// * a single Unicode scalar value, under very limited circumstances:
struct MyStaticScalar: ExpressibleByUnicodeScalarLiteral {
typealias UnicodeScalarLiteralType = StaticString
let value: StaticString
init(unicodeScalarLiteral value: StaticString) {
self.value = value
}
}

let emoji: StaticString = MyStaticScalar("\u{1F600}").value
emoji.hasPointerRepresentation // -> false
emoji.isASCII // -> false
emoji.unicodeScalar.value // -> 0x1F600
emoji.utf8CodeUnitCount // -> Fatal error!
emoji.utf8Start // -> Fatal error!

hasPointerRepresentation 一个布尔值,表示静态字符串是否存储指向以 null 结尾的 UTF-8代码单元序列的指针。

  • true:这时访问unicodeScalar会触发运行时错误;
  • false:静态字符串存储单个 Unicode 标量值。这时访问utf8开头的属性会触发运行时错误;

第三部分:树

第十章:树

树在数据结构中相当重要。它用于解决软件开发中的许多反复出现的挑战:

  • 表示层次关系。

  • 管理排序的数据。

  • 促进快速查找操作。

相关术语

  • 节点(Node)
  • 父子(Parent and child)
  • 根(Root)
  • 叶子(Leaf)

实现

1
2
3
4
5
6
7
8
9
10
11
12
13
public class TreeNode<T> {

public var value: T
public var children: [TreeNode] = []

public init(_ value: T) {
self.value = value
}

public func add(_ child: TreeNode) {
children.append(child)
}
}

遍历算法

遍历线性的集合(如:数组和链表)是非常直接的。因为有直接的首尾。

但是遍历树就复杂了。是左边优先,还是深度优先,要看具体解决的问题。

深度优先遍历(Depth-first traversal)
1
2
3
4
5
6
7
8
extension TreeNode {
public func forEachDepthFirst(visit: (TreeNode) -> Void) {
visit(self)
children.forEach {
$0.forEachDepthFirst(visit: visit)
}
}
}
层级优先遍历(Level-order traversal)
1
2
3
4
5
6
7
8
9
10
11
extension TreeNode {
public func forEachLevelOrder(visit: (TreeNode) -> Void) {
visit(self)
var queue = Queue<TreeNode>()
children.forEach { queue.enqueue($0) }
while let node = queue.dequeue() {
visit(node)
node.children.forEach { queue.enqueue($0) }
}
}
}
搜索
1
2
3
4
5
6
7
8
9
10
11
extension TreeNode where T: Equatable {
public func search(_ value: T) -> TreeNode? {
var result: TreeNode?
forEachDepthFirst { node in
if node.value == value {
result = node
}
}
return result
}
}

总结

  1. 树与链接列表具有一些相似之处,但是,链接列表节点只能链接到另一个节点,而树节点可以链接到无限多个节点。
  2. 熟悉树的术语,例如父,子,叶子和根。 这些术语中有许多是其他程序员常用的语言,将用于帮助解释其他树形结构。
  3. 遍历(例如深度优先遍历和层级遍历)不是特定于常规树的。 它们也可以在其他树上工作,尽管根据树的结构,它们的实现会略有不同。

第十一章:树挑战

打印所有的值,按照他们层级的顺序。同意层级应该打印在一行

例如:

1
2
3
15 
1 17 20
1 5 0 2 5 7

实现:

1
2
3
4
5
6
7
8
9
10
11
12
13
14
15
16
17
18
func printEachLevel<T>(for tree: TreeNode<T>) {
var queue = Queue<TreeNode<T>>()

/// 加入每层的节点计数,当打印完时,换行
var nodesLeftInCurrentLevel = 0

queue.enqueue(tree)
while !queue.isEmpty {
nodesLeftInCurrentLevel = queue.count
while nodesLeftInCurrentLevel > 0 {
guard let node = queue.dequeue() else { break }
print("\(node.value) ", terminator: "")
node.children.forEach { queue.enqueue($0) }
nodesLeftInCurrentLevel -= 1
}
print()
}
}

第一章:引言

Kitura是什么?

在词源学上,Kitura这个词松散地源于希伯来语Keturah,字面意思是“香”。

为什么选择Swift写后端?

支持为服务器编写Swift的核心论点是在应用程序的前端和后端之间共享代码和知识。如果你是一个团队,这种精简可以说是更加关键和赋权。这包括但不限于模型对象代码。

BFF(Backonnd for Frontend)是一种设计模式,很快就会成为你最好的朋友(永远?)。

这个模式在这个特定用例中起作用的几个原因:

  1. 你可以确定从此API发出请求的唯一设备将是iOS设备。这意味着你可以更少担心平衡请求负载。

  2. 你可以更好地控制对iOS设备的响应中的数据。在此之前,你可能已经等待后端开发人员最终帮助你,并根据User-Agent首部有条件地修剪响应数据。现在,你可以让后端开发人员不间断地工作,并通过将响应数据解析为你的BFF设备所需的内容来解决你的问题。

  3. 在我们的特定用例中,你可以在发送响应之前保存一个用户可能对数据库进行的查询的响应。这意味着,如果其他人在相同的位置请求餐馆信息(例子是请求包含地理位置的餐馆信息),并且存储的数据足够新以满足你的刷新策略,你甚至不必向主服务器发送查询!你只需发送缓存的数据,并相信它对你的用户来说足够新。

  4. 你可以使用你已经知道如何在Swift中编写代码的语言完成1-3!

第二章:Hello, World!

如何Kitura项目

先安装Kitura macOS App和Kitura CLI

1
2
brew tap ibm-swift/kitura
brew install kitura
1
2
3
4
5
6
7
8
9
10
11
12
13
14
15
16
17
18
kitura
Usage: kitura [options] [command]

Kitura command-line interface

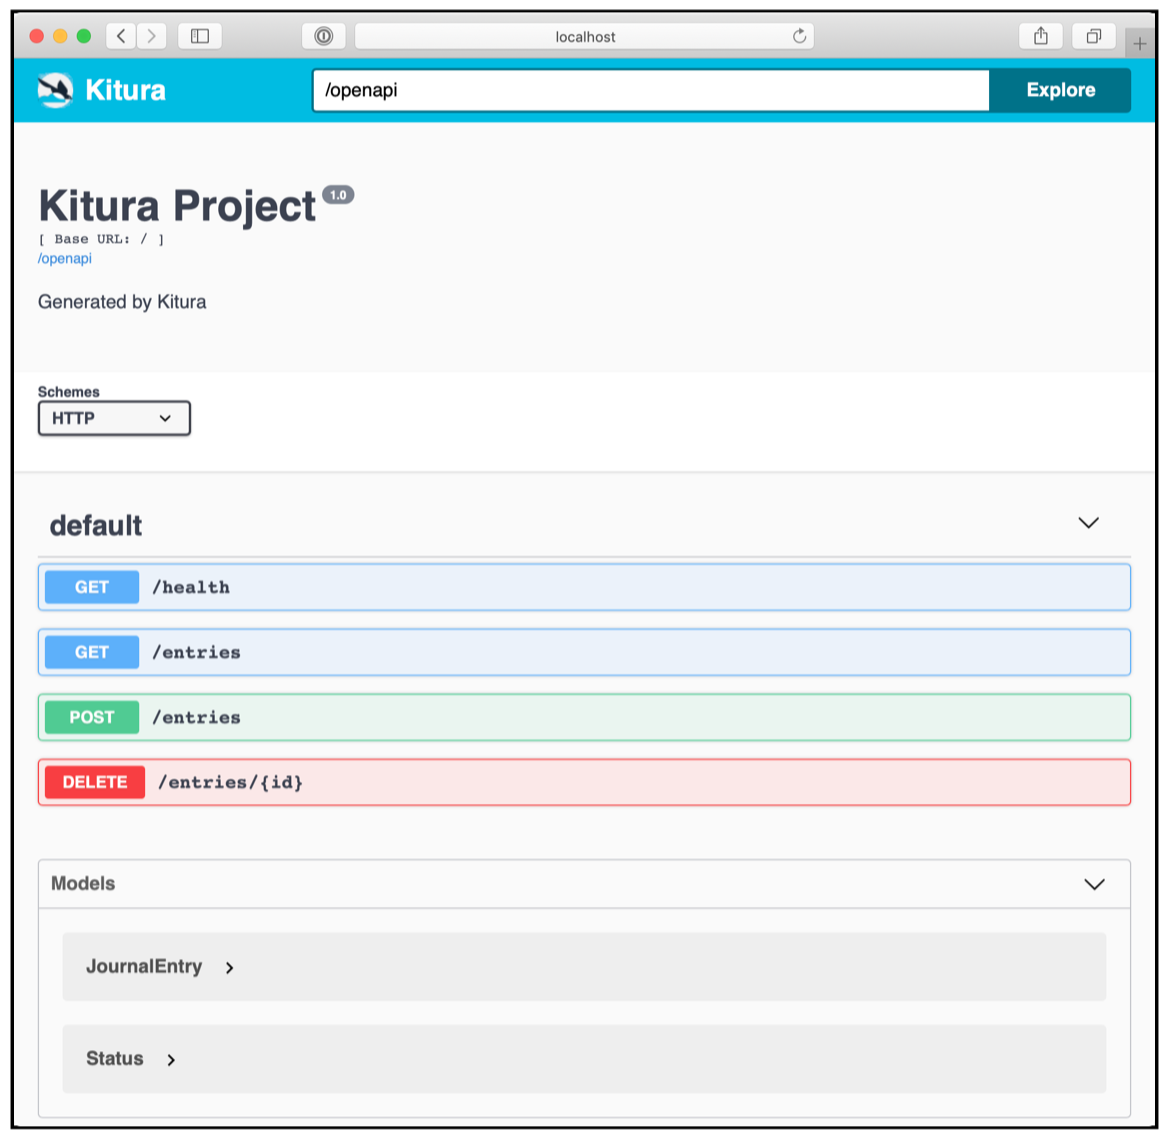
Options:
-V, --version output the version number
-h, --help output usage information

Commands:
build build the project in a local container
create interactively create a Kitura project
idt install IBM Cloud Developer Tools
init scaffold a bare-bones Kitura project
kit print Cocoapods boilerplate for KituraKit
run run the project in a local container
sdk generate a client SDK from an OpenAPI/Swagger spec
help [cmd] display help for [cmd]
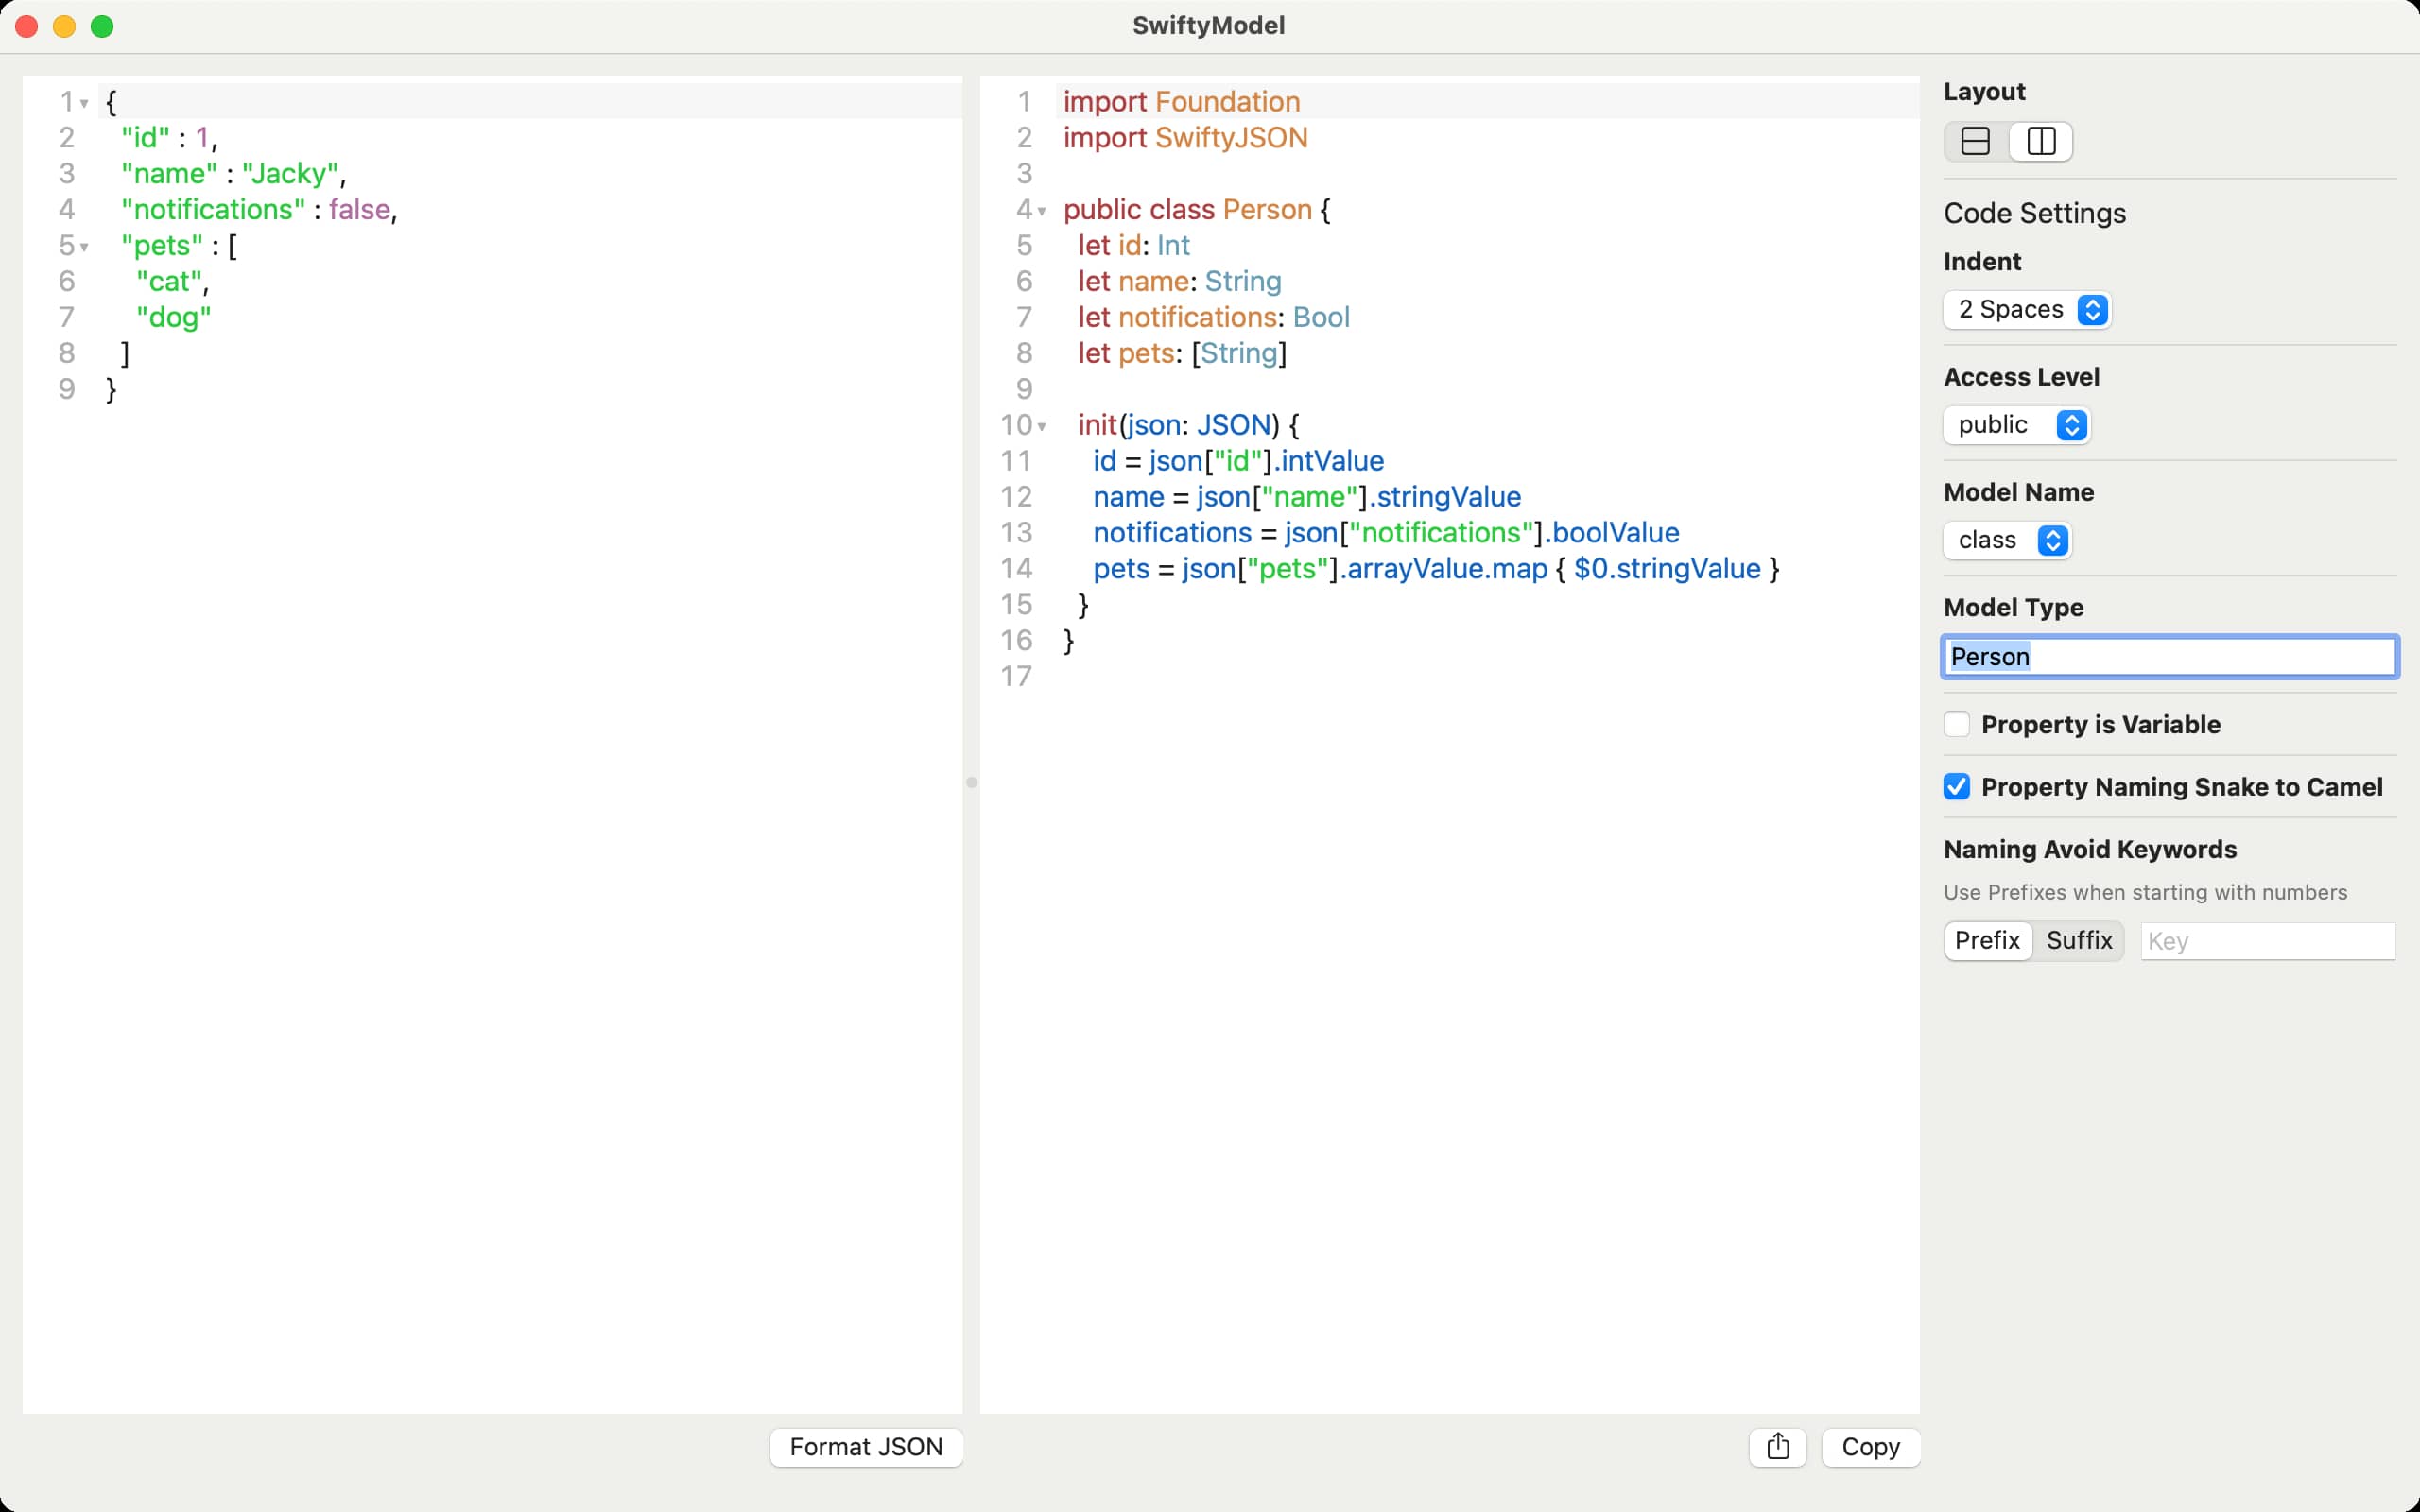
创建的Kitura项目提供了一个开箱即用的全功能Kitura应用程序。 它提供了在生产环境中运行的任何应用程序可能需要的一些功能,包括:

  • 使用HeliumLogger记录信息,警告和错误消息。

  • 使用CloudEnvironment进行动态配置查找和设置。

  • 使用Health查看和报告应用程序健康状况。

  • 使用SwiftMetrics进行App和Kitura框架指标和监控。

项目使用SPM管理依赖

1
2
3
4
5
6
7
8
9
10
11
12
13
14
15
16
17
18
19
20
// swift-tools-version:4.0
import PackageDescription

let package = Package(
name: "EmojiJournalServer",
dependencies: [
.package(url: "https://github.com/IBM-Swift/Kitura.git", .upToNextMinor(from: "2.5.0")),
.package(url: "https://github.com/IBM-Swift/HeliumLogger.git", from: "1.7.1"),
.package(url: "https://github.com/IBM-Swift/CloudEnvironment.git", from: "9.0.0"),
.package(url: "https://github.com/RuntimeTools/SwiftMetrics.git", from: "2.0.0"),
.package(url: "https://github.com/IBM-Swift/Health.git", from: "1.0.0"),
],
targets: [
.target(name: "EmojiJournalServer", dependencies: [ .target(name: "Application"), "Kitura" , "HeliumLogger"]),
.target(name: "Application", dependencies: [ "Kitura", "CloudEnvironment","SwiftMetrics","Health", ]),

.testTarget(name: "ApplicationTests" , dependencies: [.target(name: "Application"), "Kitura","HeliumLogger" ])
]
)

Application.swift包含应用程序的生命周期处理,提供emojiJournalServer目标中main.swift使用的核心init()run()方法来启动应用程序。

1
2
3
4
5
6
7
8
9
10
11
12
13
14
15
16
17
18
19
20
21
22
23
24
25
26
27
28
29
30
31
32
33
34
35
36
37
import Foundation
import Kitura
import LoggerAPI
import Configuration
import CloudEnvironment
import KituraContracts
import Health

public let projectPath = ConfigurationManager.BasePath.project.path
public let health = Health()

public class App {
let router = Router()
let cloudEnv = CloudEnv()

public init() throws {
// Run the metrics initializer
initializeMetrics(router: router)
}

func postInit() throws {
// Endpoints
initializeHealthRoutes(app: self)
router.get("/", handler: helloWorldHandler)
}

func helloWorldHandler(request: RouterRequest, response: RouterResponse, next: ()->()) {
response.send("Hello, World!")
next()
}

public func run() throws {
try postInit()
Kitura.addHTTPServer(onPort: cloudEnv.port, with: router)
Kitura.run()
}
}

运行后

欢迎页:http://localhost:8090

健康:http://localhost:8090/health

监控仪表板:http://localhost:8090/swiftmetrics-dash

HTTP吞吐量视图使用每秒请求(RPS)度量标准显示在任何时间点发生的请求量。

http://localhost:8090/metrics

使用Docker在Linux上运行应用程序

Docker和Kubernetes是Kitura部署的核心,它们提供了重要的性能和扩展优势。

1
2
kitura build
kitura run

第三章:RESTful APIs

在开始构建这些RESTful API之前,将了解RESTful API本身,包括它们的架构方法和设计原则。

REpresentational State Transfer (REST)

REpresentational State Transfer(REST)是一种架构风格或设计模式的API。 如果一个API符合Roy Fielding博士在他的2000年论文“架构风格和基于网络的软件架构设计”中提出的一系列约束,那么它就是RESTful。

Fielding提出了以下六个限制:

  1. 客户端 - 服务器

RESTful API在客户端和服务器之间提供明确的分离,允许客户端和服务器彼此独立地开发。这种分离使得为同一服务器实现多个客户端成为可能,就像你为EmojiJournal创建iOS和Web应用程序客户端时所做的那样。

  1. 无状态

RESTful API应该是无状态的。每个请求都应该是自包含的,并且不应该依赖于存储在服务器上的先前请求的任何会话上下文。

  1. 可缓存

由于RESTful API是无状态和自包含的,因此可以将请求的结果缓存到RESTful API。这可以由客户端或诸如web代理之类的中介来完成。

设计良好的RESTful API应该鼓励尽可能存储可缓存的数据,对请求的响应被隐式或显式标记为可缓存,可缓存到特定时间(expires-at)或不可缓存。

  1. 分层系统

RESTful API可以是分层的,因此客户端不知道它是直接连接到API本身还是通过代理或负载均衡器间接连接。另外,API本身可以由服务器系统本身内的若干层或源组成和构建。

  1. 按需代码(可选)

RESTful API可以提供可以直接在客户端上运行的功能。实际上,这通常仅限于在浏览器中运行的JavaScript或Java Applet。

  1. 统一界面

RESTful API最重要的概念之一是资源的使用。资源可以是API可以提供有关信息的任何对象,例如你将使用的JournalEntry资源。

提供统一接口的RESTful API必须满足以下四个约束:

  • 请求必须确定他们采取行动的资源。
  • 请求和响应必须使用资源的表示。
  • 消息必须是自描述的,自包含的,并且只能使用标准操作。
  • 资源必须通过链接连接到其他资源。

另请注意,没有提及HTTP和Web请求。虽然RESTful API最常使用HTTP实现,但这不是必需的。也就是说,我们将仅介绍如何使用标准HTTP操作构建RESTful API,我们接下来将简要介绍HTTP本身。

HyperText Transfer Protocol (HTTP)

超文本传输协议(HTTP)是一种客户端 - 服务器,基于请求 - 响应的协议,是网站和基于Web的流量的基础。 因此,它受到客户端和服务器的普遍支持。

HTTP-based RESTful APIs

URL作为资源

统一接口的第一个要求是请求标识它们所依赖的资源。在HTTP中,这是通过RESTful API使用请求的URL实现的。

例如:

1
/entries

特定资源的URL编码标识符

将提供这些URL以使客户端能够与所有日记帐分录和特定日记帐分录进行交互:

1
2
/entries 
/entries/<identifier>

用于资源组的URL编码查询参数

你可能还希望提供与资源子集的API。 这再次通过URL完成,这次使用URL查询参数。

URL查询参数以?开头。 他们可以使用<key> = <value>格式的键值对传递有关资源的任何其他信息。 可以使用键值对之间的分隔符聚合和传递多个键值对。

1
2
3
/entries 
/entries?emoji=<emoji>&date=<date>
/entries/<idenfifier>

分层API的分层URL

RESTful URL也可以是分层的。 在你的EmojiJournal应用程序中,你只会支持拥有单个EmojiJournal的用户。 但是,假设你希望支持拥有多个期刊的用户,每个期刊都有自己的日记帐分录。

1
2
3
4
/journals 
/journals/<identifier>
/journals/<identifier>/entries
/journals/<identifier>/entries?emoji=<emoji>&date=<date> /journals/<identifier>/entries/<identifier>

例如,对以下URL的客户端请求将与日记2中的条目20进行交互:

1
/journals/2/entries/20

资源表示

回想一下,统一接口的第二个概念是请求和响应应该使用资源的表示。 这是通过在HTTP正文数据中编码资源的表示,在基于HTTP的RESTful API中实现的。

HTTP消息,无论是请求还是响应,基本上由两部分组成:一组标题和正文数据。 为了完整性,响应还包含一个状态代码,用于报告请求的状态。

HTTP首部和正文数据

HTTP首部为请求和响应提供了额外的元数据。 首部在请求或响应开始时传输,并存储为键值对,一些首部允许多个值。

你可以使用HTTP首部存储你希望的任何其他信息。 你应该了解两个正式定义的标准标题,请参阅https://www.w3.org/Protocols/rfc2616/rfc2616-sec14.html(由正式的核心RFC规范定义),以及不太正式但广泛使用的非标准的首部,请参阅https://en.wikipedia.org/wiki/List_of_HTTP_header_fields#Common_non-standard_request_fields

标准头用于传递诸如Cookie,授权,ContentType(描述正文数据的媒体类型)和Content-Length(以字节为单位描述正文数据长度)等信息。

HTTP消息正文包含与请求或响应关联的数据。 在响应对网页的请求的情况下,正文数据包含网页本身的来源。 看一下对Hello,World的请求生成的HTTP响应! 你在上一章中创建的应用程序。

正文数据中的资源表示

如前所述,RESTful API对返回的HTTP正文数据中的资源表示进行编码。 身体通常由三部分组成:

  1. Content-Type首部

Content-Type首部表示用于表示正文数据中的资源的编码。最常用的方法是使用JavaScript Object Notation(JSON)对表示进行编码,并将Content-Type首部设置为application/json。有时与RESTful API一起使用的身体数据编码的其他示例包括Protobuf,Thrift和Avro。

  1. 接受首部(仅限请求)

接受首部指示客户端将接受响应的编码。这通常是application/json,但它也可以包含编码列表。例如,如果客户端在JSON和Protobuf中都接受了响应,则此值可能设置为:application/json;application/protobuf

  1. 编码的正文数据

最后,使用Content-Type首部中设置的编码将资源本身编码为正文数据。在最常见的application/json场景中,这是资源的JSON表示。 JSON的细节取决于特定资源的模型。例如,在本书后面稍后,JournalEntry的资源将包含id,emoji和date,类似于:

1
2
3
4
5
{
"id":"1",
"emoji":"😊 ",
"date":"2018-09-18T00:07:01Z"
}

自我描述性的信息

你已经了解了资源的识别和表示,但你如何对这些资源进行操作?

统一接口的第三个原则解决了这个问题。 它规定请求和响应都应该是自描述的,并且它们仅使用客户端和服务器都理解的标准操作。 在基于HTML的RESTful API中,这是通过使用特定的HTTP方法实现的。

RFC 2616概述了八种HTTP方法:OPTIONS,GET,HEAD,POST,PUT,DELETE,TRACE和CONNECT。

通过链接连接资源

统一接口的第四个也是最后一个概念是资源应该通过链接连接到其他资源。

如你所见,基于HTTP的RESTful API使用URL和基于URL的标识符来提供对资源的访问并指定单个资源。 因此,资源之间的链接只是进一步的RESTful URL和链接到连接资源的基于URL的标识符。

有两种常见的场景需要URL或标识资源:

  • 请求的资源引用另一个(子或相关)资源。
  • 你需要知道资源的标识符。

构建RESTful API

image-20190806103823282

到目前为止,你已经学会了所有基础知识。 当你了解有关设计和实现RESTful API的更多信息时,你会发现除了我们在此处介绍的范围之外还有其他最佳实践。 这包括设置正确的Content-Type和Accepts标头,为成功创建设置Location标头,并为请求中的任何故障设置正确的HTTP状态代码。

此外,需要对请求和响应主体进行编码和解码,最常见的是来自JSON。 这曾经是一项艰巨的任务。 由于强大的Codable协议,Swift使JSON优雅且无痛。

第四章:Codable简介

Codable协议是Swift编程语言最强大的功能之一。 在一个句子中,当你扩展对象以符合Codable时,你可以使该对象自动序列化为任何外部可读格式,例如JSON,XML或协议缓冲区。

The bare necessities

直接看一个例子

1
2
3
4
5
6
7
8
9
10
11
12
13
14
15
16
17
18
19
20
21
22
23
24
25
26
27
28
29
30
31
32
33
34
35
36
37
38
39
40
41
42
43
44
45
46
47
48
49
50
51
52
53
54
55
56
57
58
59
60
import Foundation

// 1 Cadabe 是一个组合的协议:Decodable & Encodable

public struct Song: Codable {
var title: String
var length: Int

enum CodingKeys: String, CodingKey {
case title = "songTitle"
case length = "songLength"
}
}

public struct Animal: Codable {
var name: String
var age: Int?
var isFriendly: Bool
var birthday: Date
var songs: [Song]
}

// 2 嵌套
let baloo = Animal(name: "Baloo",
age: 5,
isFriendly: true,
birthday: Date(),
songs: [Song(title: "The Bare Necessities", length: 180)])
let bagheera = Animal(name: "Bagheera",
age: nil,
isFriendly: true,
birthday: Date(),
songs: [Song(title: "Jungle's No Place For A Boy", length: 95)])

// 3 处理日期格式,驼峰式与蛇式转换
let encoder = JSONEncoder()
encoder.keyEncodingStrategy = .convertToSnakeCase
encoder.dateEncodingStrategy = .iso8601
let decoder = JSONDecoder()
decoder.keyDecodingStrategy = .convertFromSnakeCase
decoder.dateDecodingStrategy = .iso8601

do {
// 4
let encodedBaloo = try encoder.encode(baloo)
if let balooString = String(data: encodedBaloo, encoding: .utf8) {
print(balooString)
}
let encodedBagheera = try encoder.encode(bagheera)
if let bagheeraString = String(data: encodedBagheera, encoding: .utf8) {
print(bagheeraString)
}
// 5
let decodedBaloo = try decoder.decode(Animal.self, from: encodedBaloo)
print(decodedBaloo)
let decodedBagheera = try decoder.decode(Animal.self, from: encodedBagheera)
print(decodedBagheera)
} catch let error {
print("Error occurred: \(error.localizedDescription)")
}

第五章:Codable Routing

Codable Routing支持以完全类型安全的方式在你的应用程序的结构和类以及HTTP请求和响应中使用的正文数据之间自动转换。 它大大减少了构建路由处理程序时需要编写的代码,并使Kitura能够代表你执行数据验证和错误处理。

看Model和Route的实现:

1
2
3
4
5
6
7
import Foundation

struct JournalEntry: Codable {
var id: String?
var emoji: String
var date: Date
}
1
2
3
4
5
6
7
8
9
10
11
12
13
14
15
16
17
18
19
20
21
22
23
24
25
26
27
28
29
30
31
import Foundation
import LoggerAPI
import Kitura

var entries: [JournalEntry] = []

func initializeEntryRoutes(app: App) {
app.router.get("/entries", handler: getAllEntries)
app.router.post("/entries", handler: addEntry)
app.router.delete("/entries", handler: deleteEntry)
Log.info("Journal entry routes created")
}

func addEntry(entry: JournalEntry, completion: @escaping (JournalEntry?, RequestError?) -> Void) {
var storedEntry = entry
storedEntry.id = entries.count.value
entries.append(storedEntry)
completion(storedEntry, nil)
}

func getAllEntries(completion: @escaping ([JournalEntry]?, RequestError?) -> Void) -> Void {
completion(entries, nil)
}

func deleteEntry(id: String, completion: @escaping (RequestError?) -> Void) {
guard let index = entries.index(where: { $0.id == id }) else {
return completion(.notFound)
}
entries.remove(at: index)
completion(nil)
}

Codable Routing的一个独特功能是它只需要你在处理函数中定义你希望从请求中接收的值,以及你将通过完成处理程序添加到响应中的值。

目前,Kitura仅支持从application/json解码。 这意味着,实际上,Content-Type当前必须始终设置为application/json。 但是,Kitura团队计划在即将发布的版本中支持其他编码类型。

第六章:OpenAPI规范

Swagger的目标

在Tony Tam开创性的开源项目的基础上,其他公司开始做出贡献。 最终,Linux基金会承担了该项目的赞助,并将其名称更改为OpenAPI Initiative。 这种广泛的支持使OpenAPI规范在开源软件开发中占据了非常突出的位置。

当Tony开始研究Swagger API项目时,他确定了三个关键目标:

  • API开发
  • API文档
  • API交互

生成你的规格

通过添加Kitura-OpenAPI依赖

1
.package(url: "https://github.com/IBM-Swift/Kitura-OpenAPI.git", from: "1.1.1"),

运行后

http://localhost:8080/openapi

1
2
3
4
5
6
7
8
9
10
11
12
13
14
15
16
17
18
19
20
21
22
23
24
25
26
27
28
29
30
31
32
33
34
35
36
37
38
39
40
41
42
43
44
45
46
47
48
49
50
51
52
53
54
55
56
57
58
59
60
61
62
63
64
65
66
67
68
69
70
71
72
73
74
75
76
77
78
79
80
81
82
83
84
85
86
87
88
89
90
91
92
93
94
95
96
97
98
99
100
101
102
103
104
105
106
107
108
109
110
111
112
113
114
115
116
117
118
119
120
121
122
{
"schemes" : [
"http"
],
"swagger" : "2.0",
"info" : {
"version" : "1.0",
"title" : "Kitura Project",
"description" : "Generated by Kitura"
},
"paths" : {
"\/entries" : {
"get" : {
"responses" : {
"200" : {
"schema" : {
"type" : "array",
"items" : {
"$ref" : "#\/definitions\/JournalEntry"
}
},
"description" : "successful response"
}
},
"consumes" : [
"application\/json"
],
"produces" : [
"application\/json"
]
},
"post" : {
"consumes" : [
"application\/json"
],
"produces" : [
"application\/json"
],
"responses" : {
"200" : {
"schema" : {
"$ref" : "#\/definitions\/JournalEntry"
},
"description" : "successful response"
}
},
"parameters" : [
{
"in" : "body",
"name" : "input",
"required" : true,
"schema" : {
"$ref" : "#\/definitions\/JournalEntry"
}
}
]
}
},
"\/health" : {
"get" : {
"responses" : {
"200" : {
"schema" : {
"$ref" : "#\/definitions\/Status"
},
"description" : "successful response"
}
},
"consumes" : [
"application\/json"
],
"produces" : [
"application\/json"
]
}
},
"\/entries\/{id}" : {
"delete" : {
"consumes" : [
"application\/json"
],
"produces" : [
"application\/json"
],
"responses" : {
"200" : {
"description" : "successful response"
}
},
"parameters" : [
{
"in" : "path",
"name" : "id",
"required" : true,
"type" : "string"
}
]
}
}
},
"basePath" : "\/",
"definitions": {
"JournalEntry": {
"type": "object",
"required": ["date","emoji"],
"properties": {
"id": {"type":"string"},
"emoji": {"type":"string"},
"date": {"type":"number"}
}
},
"Status": {
"type": "object",
"required": ["status","details","timestamp"],
"properties": {
"status": {"type":"string"},
"details": {"items":{"type":"string"},"type":"array"},
"timestamp": {"type":"string"}
}
}
}
}

此代码段的顶部表示你正在查看路径/entries的GET路由。 三个子节点描述了这条路线:

  • “responses”提供用户可以接收的一系列响应。

  • “consumes”指定必须给出此方法的数据类型。

  • “produces”描述响应将包含的数据类型。

使用Kitura OpenAPI UI

同步生成的还有UI调试界面

http://localhost:8080/openapi/ui

image-20190807140446505

这对于你需要进行快速而肮脏的测试的情况非常有用 - 或者如果你无法让顽固的队友相信这个模块真的有用!

为你的iOS应用生成SDK

终端运行,即可生成SDK,一个功能齐全的Swift SDK,可以处理与此特定服务器的所有网络通信。

1
2
3
4
5
6
docker pull swaggerapi/swagger-codegen-cli
docker run --rm -v ${PWD}:/local swaggerapi/swagger-codegen-cli langs
mkdir GeneratedSDK
touch specification.json
// 复制http://localhost:8080/openapi的内容到specification.json
docker run --rm -v ${PWD}:/local swaggerapi/swagger-codegen-cli generate -i /local/specification.json -l swift -o /local/GeneratedSDK

在实践中,这不仅可以节省时间并让你快速启动和运行,还可以节省错误,并且对于那些没有(喘气)在Swift工作的人来说尤其有用!

第一部分:引言

第一章:前言

数据结构是一门经过充分研究的学科,其概念与语言无关; 来自C的数据结构在功能上和概念上与任何其他语言中的相同数据结构相同,例如Swift。 与此同时,Swift的高级表现力使其成为学习这些核心概念的理想选择,而不会牺牲太多的性能。

Swift标准库有一小组通用集合类型; 他们甚至没有涵盖每一个案例。正如您将看到的,这些 原始的类型可以用作构建更复杂和特殊用途构造的一个很好的起点。 了解比标准数组和字典更多的数据结构,您可以使用更多的工具来构建自己的应用程序。

第二章:Swift标准库

在开始构建自己的自定义数据结构之前,了解Swift标准库已经提供的主要数据结构非常重要。

字典缺乏明确的排序劣势,却又带来了一些其他的优点。 与数组不同,字典不需要担心元素的转移。 插入字典总是O(1)。 查找操作也在O(1)时间内完成,这比在需要O(n)扫描的数组中找到特定元素要快得多。

第三章:复杂度

常见的时间复杂度和空间复杂度。

对于计算机,算法的资源是内存。空间复杂度就意味着内存占用率。

总结

  • 时间复杂度衡量输入大小增加时运行算法所需的时间。

  • 空间复杂度衡量算法运行所需的资源。

  • Big O表示法用于表示时间和空间复杂性的一般形式。

  • 时间和空间复杂性是可扩展性的高级度量; 它们不测量算法本身的实际速度。

  • 对于小型数据集,时间复杂度通常无关紧要。 拟线性算法可能比线性算法慢。

第二部分:基本数据类型

第四章:链表

链表是以线性单向序列排列的值的集合。链表比连续存储选项(如Swift数组)具有几个理论上的优势:

  • 从列表前面插入和删除恒定时间。
  • 可靠的性能特征。

image-20190801154442688

如图所示,链表是一系列节点。 节点有两个职责:

1.保存一个值。

2.保存对下一个节点的引用。 空表示列表的结尾。image-20190801154554314

节点

1
2
3
4
5
6
7
8
9
10
public class Node<Value> {

public var value: Value
public var next: Node?

public init(value: Value, next: Node? = nil) {
self.value = value
self.next = next
}
}

链表

1
2
3
4
5
6
7
8
9
10
11
12
13
14
15
16
17
18
19
20
21
22
23
24
25
26
27
28
29
30
31
32
33
34
35
36
37
38
39
40
41
42
43
44
45
46
47
48
49
50
51
52
53
54
55
56
57
58
59
60
61
62
63
64
65
66
67
68
69
70
71
72
73
74
75
76
77
78
79
80
81
82
83
84
85
86
87
88
89
90
91
92
93
94
95
96
97
98
99
100
101
102
103
104
105
106
107
108
109
110
111
112
113
114
115
116
117
118
119
120
121
122
123
124
125
126
127
128
129
130
131
132
133
134
135
136
137
138
139
140
141
142
143
144
145
146
147
148
149
150
151
152
153
154
155
156
157
158
159
160
161
162
163
164
165
166
167
168
169
170
171
172
public struct LinkedList<Value> {

public var head: Node<Value>?
public var tail: Node<Value>?

public init() {}

public var isEmpty: Bool {
return head == nil
}

// MARK: - 增加和删除节点的方法

// 时间复杂度:O(1)
public mutating func push(_ value: Value) {
copyNodes()
head = Node(value: value, next: head)
if tail == nil {
tail = head
}
}

// 时间复杂度:O(1)
public mutating func append(_ value: Value) {
copyNodes()
guard !isEmpty else {
push(value)
return
}
tail!.next = Node(value: value)
tail = tail!.next
}

// 时间复杂度:O(i) , i 就是给定的index
public func node(at index: Int) -> Node<Value>? {
var currentNode = head
var currentIndex = 0
while currentNode != nil && currentIndex < index {
currentNode = currentNode!.next
currentIndex += 1
}
return currentNode
}

// 时间复杂度:O(1)
@discardableResult
public mutating func insert(_ value: Value, after node: Node<Value>) -> Node<Value> {
copyNodes()
guard tail !== node else {
append(value)
return tail!
}
node.next = Node(value: value, next: node.next)
return node.next!
}

// 时间复杂度:O(1)
@discardableResult
public mutating func pop() -> Value? {
copyNodes()
defer {
head = head?.next
if isEmpty {
tail = nil
}
}
return head?.value
}

// 时间复杂度:O(n)
@discardableResult
public mutating func removeLast() -> Value? {
copyNodes()
guard let head = head else {
return nil
}
guard head.next != nil else {
return pop()
}
var prev = head
var current = head
while let next = current.next {
prev = current
current = next
}
prev.next = nil
tail = prev
return current.value
}

// 时间复杂度:O(1)
@discardableResult
public mutating func remove(after node: Node<Value>) -> Value? {
copyNodes()
defer {
if node.next === tail {
tail = node
}
node.next = node.next?.next
}
return node.next?.value
}

// MARK: - 实现值类型和写入时复制
//使用COW实现价值语义的策略非常简单。在改变链接列表的内容之前,您希望执行底层存储的副本并将所有引用(头部和尾部)更新为新副本。
private mutating func copyNodes() {
guard !isKnownUniquelyReferenced(&head) else {
return
}
guard var oldNode = head else {
return
}

head = Node(value: oldNode.value)
var newNode = head

while let nextOldNode = oldNode.next {
newNode!.next = Node(value: nextOldNode.value)
newNode = newNode!.next
oldNode = nextOldNode
}

tail = newNode
}
}

// MARK: - 实现Swift的Collection协议

//Swift Collection还允许通过下标进行访问,这是一个很好的术语,用于表示索引可以映射到集合中的值。
extension LinkedList: Collection {

public struct Index: Comparable {

public var node: Node<Value>?

static public func ==(lhs: Index, rhs: Index) -> Bool {
switch (lhs.node, rhs.node) {
case let (left?, right?):
return left.next === right.next
case (nil, nil):
return true
default:
return false
}
}

static public func <(lhs: Index, rhs: Index) -> Bool {
guard lhs != rhs else {
return false
}
let nodes = sequence(first: lhs.node) { $0?.next }
return nodes.contains { $0 === rhs.node }
}
}

public var startIndex: Index {
return Index(node: head)
}

public var endIndex: Index {
return Index(node: tail?.next)
}

public func index(after i: Index) -> Index {
return Index(node: i.node?.next)
}

public subscript(position: Index) -> Value {
return position.node!.value
}
}

关键点

  • 链接列表是线性和单向的。 只要将引用从一个节点移动到另一个节点,就无法返回。
  • 链接列表的头部第一次插入具有O(1)时间复杂度。 对于头部第一次插入,数组有O(n)时间复杂度。
  • 符合Swift收集协议(如序列和集合),可为相当少的要求提供一系列有用的方法。
  • 写时复制行为使您可以实现值语义。

第五章:链表挑战

逆序打印所有节点元素

1
2
3
4
5
6
7
8
9
10
func printInReverse<T>(_ list: LinkedList<T>) {
//巧妙的递归:先迭代后打印,这样打印的就是逆序了
printInReverse(list.head)
}

private func printInReverse<T>(_ node: Node<T>?) {
guard let node = node else { return }
printInReverse(node.next)
print(node.value)
}

取中间节点

1
2
3
4
5
6
7
8
9
10
11
12
func getMiddle<T>(_ list: LinkedList<T>) -> Node<T>? {
//两个步长差一倍,这样快的遍历到终点,慢的刚好到中间
var fast = list.head
var slow = list.head

while let nextFast = fast?.next {
fast = nextFast.next
slow = slow?.next
}

return slow
}

反转链表

1
2
3
4
5
6
7
8
9
10
11
12
13
14
15
16
17
18
19
20
21
22
extension LinkedList {
// 不断的分割链表,从头部开始,下一步时把之前分割的节点拼接在新的节点之后。
// 如此遍历到底,就实现了逆序。
// 核心思路:把每个节点的前节点变成后节点,同时通过遍历时分割成2~3个分段。
mutating func reverse() {
tail = head

var current = head?.next
// 临时存储逆序的链表
var prev = head
prev?.next = nil

while current != nil {
let next = current?.next
current?.next = prev
prev = current
current = next
}

head = prev
}
}

合并两个已经排序好的链表

例如:

1
2
3
4
5
// list1 1 -> 4 -> 10 -> 11

// list2 -1 -> 2 -> 3 -> 6

// merged list -1 -> 1 -> 2 -> 3 -> 4 -> 6 -> 10 -> 11
1
2
3
4
5
6
7
8
9
10
11
12
13
14
15
16
17
18
19
20
21
22
23
24
25
26
27
28
29
30
31
32
33
34
35
36
37
38
39
40
41
42
43
44
45
46
47
48
49
50
51
52
53
54
55
56
57
58
59
60
61
62
63
64
func mergeSorted<T: Comparable>(_ left: LinkedList<T>,
_ right: LinkedList<T>) -> LinkedList<T> {
guard !left.isEmpty else {
return right
}

guard !right.isEmpty else {
return left
}

// 定义新的链表的首尾
var newHead: Node<T>?
var tail: Node<T>?

// 原有链表的游标,后面以此遍历
var currentLeft = left.head
var currentRight = right.head

// 初始设置
if let leftNode = currentLeft, let rightNode = currentRight {
if leftNode.value < rightNode.value {
newHead = leftNode
currentLeft = leftNode.next
} else {
newHead = rightNode
currentRight = rightNode.next
}
tail = newHead
}

// 遍历
while let leftNode = currentLeft, let rightNode = currentRight {
if leftNode.value < rightNode.value {
tail?.next = leftNode
currentLeft = leftNode.next
} else {
tail?.next = rightNode
currentRight = rightNode.next
}
tail = tail?.next
}

if let leftNode = currentLeft {
tail?.next = leftNode
}

if let rightNode = currentRight {
tail?.next = rightNode
}

// 处理新的链表的首尾
var list = LinkedList<T>()

list.head = newHead
// 找到真的尾部节点
list.tail = {
while let next = tail?.next {
tail = next
}
return tail
}()

return list
}

创建一个从链表中删除所有特定元素的函数

1
2
3
4
5
6
7
8
9
10
11
12
13
14
15
16
17
18
19
20
21
22
23
24
25
extension LinkedList where Value: Equatable {
mutating func removeAll(_ value: Value) {
// 头部的值相等时单独处理
while let head = self.head, head.value == value {
self.head = head.next
}

var current = head?.next
var prev = head

// 遍历
while let currentNode = current {
guard currentNode.value != value else {
prev?.next = currentNode.next
current = prev?.next
continue
}

prev = current
current = current?.next
}

tail = prev
}
}

在时间复杂度上优化,所以一般都是2~3个临时变量(牺牲一点空间复杂度)。相当于让更多人协同做一件事情,肯定更快。但是如果是资源有限的时候,比如说雇人做事,总的成本不一定会减少。但是通常情况下,电脑的内存容量是既定的,而且够用的情况下,就要优化时间复杂度,不用吝惜内存。

第六章:栈

栈无处不在。 以下是您要栈的一些常见示例:

  • 薄煎饼
  • 书籍
  • 纸张

在概念上,栈数据结构与物理栈相同。 将项目添加到栈时,将其放在栈顶部。 从栈中删除项目时,始终会删除最顶层的项目。

栈的操作

栈的操作只有两个:

  1. push:将元素添加到栈顶部。
  2. pop:删除栈的顶部元素。

这意味着您只能在数据结构的一侧添加或删除元素。在计算机科学中,栈被称为LIFO(后进先出)数据结构。最后推入的元素是第一个被弹出的元素。

实现

1
2
3
4
5
6
7
8
9
10
11
12
13
14
15
16
17
18
19
20
21
22
23
24
25
26
27
28
29
30
31
32
33
34
35
36
37
38
39
40
41
42
43
44
45
46
47
48
//泛型Element为存储的元素
public struct Stack<Element> {

//内部为数组存储所有元素
private var storage: [Element] = []

public init() { }

public init(_ elements: [Element]) {
storage = elements
}

public mutating func push(_ element: Element) {
storage.append(element)
}

@discardableResult
public mutating func pop() -> Element? {
return storage.popLast()
}

public func peek() -> Element? {
return storage.last
}

public var isEmpty: Bool {
return peek() == nil
}
}

extension Stack: CustomStringConvertible {
public var description: String {
let topDivider = "----top----\n"
let bottomDivider = "\n-----------"

let stackElements = storage
.map { "\($0)" }
.reversed()
.joined(separator: "\n")
return topDivider + stackElements + bottomDivider
}
}

extension Stack: ExpressibleByArrayLiteral {
public init(arrayLiteral elements: Element...) {
storage = elements
}
}

你可能想知道是否可以为栈采用Swift集合协议。栈的目的是限制访问数据的方式的数量,并采用诸如Collection之类的协议将通过迭代器和下标公开所有元素来违背此目标。在这种情况下,少即是多!

第七章:栈挑战

逆序打印链表,但是不能用递归

1
2
3
4
5
6
7
8
9
10
11
12
13
14
15
16
17
18
19
20
21
22
23
let list: LinkedList<Int> = {
var list = LinkedList<Int>()
list.push(3)
list.push(2)
list.push(1)
return list
}()

func printInReverse<T>(_ list: LinkedList<T>) {
var current = list.head
var stack = Stack<T>()

while let node = current {
stack.push(node.value)
current = node.next
}

while let value = stack.pop() {
print(value)
}
}

printInReverse(list)

检查括号的匹配

1
2
3
4
5
6
7
8
9
10
11
12
13
14
15
16
17
18
19
20
21
22
var testString1 = "h((e))llo(world)()"
var testString2 = "(hello world"

func checkParentheses(_ string: String) -> Bool {
var stack = Stack<Character>()

for character in string {
if character == "(" {
stack.push(character)
} else if character == ")" {
if stack.isEmpty {
return false
} else {
stack.pop()
}
}
}
return stack.isEmpty
}

checkParentheses(testString1)
checkParentheses(testString2)

第八章:队列

我们都熟悉排队,无论是买票还是排队打印。

队列使用FIFO或先进先出顺序,这意味着添加的第一个元素将始终是第一个被删除的元素。当您需要维护元素的顺序以便稍后处理时,队列很方便。

定义

让我们先确定队列的协议:

1
2
3
4
5
6
7
8
9
10
public protocol Queue {

associatedtype Element
///在队列后面插入一个元素。如果操作成功,则返回true。
mutating func enqueue(_ element: Element) -> Bool
///删除队列前面的元素并将其返回。
mutating func dequeue() -> Element?
var isEmpty: Bool { get }
var peek: Element? { get }
}

在以下部分中,将以四种不同的方式创建队列:

  1. 数组
  2. 双向列表
  3. 环形缓冲区
  4. 双栈

用数组来实现

1
2
3
4
5
6
7
8
9
10
11
12
13
14
15
16
17
18
19
20
21
22
23
24
25
26
27
28
29
30
31
32
33
34
35
36
37
38
public struct QueueArray<T>: Queue {

private var array: [T] = []
public init() {}

public var isEmpty: Bool {
return array.isEmpty
}

public var peek: T? {
return array.first
}

public mutating func enqueue(_ element: T) -> Bool {
array.append(element)
return true
}

public mutating func dequeue() -> T? {
return isEmpty ? nil : array.removeFirst()
}
}

extension QueueArray: CustomStringConvertible {

public var description: String {
return String(describing: array)
}
}

var queue = QueueArray<String>()
queue.enqueue("Ray")
queue.enqueue("Brian")
queue.enqueue("Eric")
queue
queue.dequeue()
queue
queue.peek
优缺点
image-20190912160423263

很明显只有enqueue是O(1),其他都是O(n)。

用双向链表来实现

1
2
3
4
5
6
7
8
9
10
11
12
13
14
15
16
17
18
19
20
21
22
23
24
25
26
27
28
29
30
31
32
33
34
35
36
37
38
39
40
41
42
43
44
45
46
47
48
49
50
51
52
53
54
55
56
57
58
59
60
61
62
63
64
65
66
67
68
69
70
71
72
73
74
75
76
77
78
79
80
81
82
83
84
85
86
87
88
89
90
91
92
93
94
95
96
97
98
99
100
101
102
103
104
105
106
107
108
109
110
111
112
113
114
115
116
117
118
119
120
121
122
123
124
125
126
127
128
129
130
131
132
133
134
135
136
137
138
139
140
141
142
143
144
145
146
147
public class QueueLinkedList<T>: Queue {

private var list = DoublyLinkedList<T>()
public init() {}

public func enqueue(_ element: T) -> Bool {
list.append(element)
return true
}

public func dequeue() -> T? {
guard !list.isEmpty, let element = list.first else {
return nil
}
return list.remove(element)
}

public var peek: T? {
return list.first?.value
}

public var isEmpty: Bool {
return list.isEmpty
}
}

extension QueueLinkedList: CustomStringConvertible {

public var description: String {
return String(describing: list)
}
}

var queue = QueueLinkedList<String>()
queue.enqueue("Ray")
queue.enqueue("Brian")
queue.enqueue("Eric")
queue
queue.dequeue()
queue
queue.peek

// MARK: - DoublyLinkedList

public class Node<T> {

public var value: T
public var next: Node<T>?
public var previous: Node<T>?

public init(value: T) {
self.value = value
}
}

extension Node: CustomStringConvertible {

public var description: String {
return String(describing: value)
}
}

public class DoublyLinkedList<T> {

private var head: Node<T>?
private var tail: Node<T>?

public init() { }

public var isEmpty: Bool {
return head == nil
}

public var first: Node<T>? {
return head
}

public func append(_ value: T) {
let newNode = Node(value: value)

guard let tailNode = tail else {
head = newNode
tail = newNode
return
}

newNode.previous = tailNode
tailNode.next = newNode
tail = newNode
}

public func remove(_ node: Node<T>) -> T {
let prev = node.previous
let next = node.next

if let prev = prev {
prev.next = next
} else {
head = next
}

next?.previous = prev

if next == nil {
tail = prev
}

node.previous = nil
node.next = nil

return node.value
}
}

extension DoublyLinkedList: CustomStringConvertible {

public var description: String {
var string = ""
var current = head
while let node = current {
string.append("\(node.value) -> ")
current = node.next
}
return string + "end"
}
}

public class LinkedListIterator<T>: IteratorProtocol {

private var current: Node<T>?

init(node: Node<T>?) {
current = node
}

public func next() -> Node<T>? {
defer { current = current?.next }
return current
}
}

extension DoublyLinkedList: Sequence {

public func makeIterator() -> LinkedListIterator<T> {
return LinkedListIterator(node: head)
}
}
优缺点image-20190912161101034

出来空间复杂度是O(n),其他的都是O(1)。

双向列表的主要弱点在表中并不明显。尽管有O(1)的性能,但它的开销很高。每个元素都必须有额外的存储空间用于前向和后向引用。而且,每次创建新元素时,都需要相对昂贵的动态分配。相比之下,数组进行批量分配,速度更快。

用环形缓冲区来实现

环形缓冲区,也称为循环缓冲区,是固定大小的阵列。当最终没有更多项目需要删除时,这种数据结构战略性地包含在开头。

详见:[https://github.com/raywenderlich/swift-algorithm-club/tree/master/Ring%20Buffer](https://github.com/raywenderlich/swift-algorithm-club/tree/master/Ring Buffer)

1
2
3
4
5
6
7
8
9
10
11
12
13
14
15
16
17
18
19
20
21
22
23
24
25
26
27
28
29
30
31
32
33
34
35
36
37
38
39
40
41
42
43
44
45
46
47
48
49
50
51
52
53
54
55
56
57
58
59
60
61
62
63
64
65
66
67
68
69
70
71
72
73
74
75
76
77
78
79
80
81
82
83
84
85
86
87
88
89
90
91
92
93
94
95
96
97
98
99
100
101
102
public struct QueueRingBuffer<T>: Queue {

private var ringBuffer: RingBuffer<T>

public init(count: Int) {
ringBuffer = RingBuffer<T>(count: count)
}

public var isEmpty: Bool {
return ringBuffer.isEmpty
}

public var peek: T? {
return ringBuffer.first
}

public mutating func enqueue(_ element: T) -> Bool {
return ringBuffer.write(element)
}

public mutating func dequeue() -> T? {
return isEmpty ? nil : ringBuffer.read()
}
}

extension QueueRingBuffer: CustomStringConvertible {

public var description: String {
return String(describing: ringBuffer)
}
}

var queue = QueueRingBuffer<String>(count: 10)
queue.enqueue("Ray")
queue.enqueue("Brian")
queue.enqueue("Eric")
queue
queue.dequeue()
queue
queue.peek

// MARK: - RingBuffer

public struct RingBuffer<T> {

private var array: [T?]
private var readIndex = 0
private var writeIndex = 0

public init(count: Int) {
array = Array<T?>(repeating: nil, count: count)
}

public var first: T? {
return array[readIndex]
}

public mutating func write(_ element: T) -> Bool {
if !isFull {
array[writeIndex % array.count] = element
writeIndex += 1
return true
} else {
return false
}
}

public mutating func read() -> T? {
if !isEmpty {
let element = array[readIndex % array.count]
readIndex += 1
return element
} else {
return nil
}
}

private var availableSpaceForReading: Int {
return writeIndex - readIndex
}

public var isEmpty: Bool {
return availableSpaceForReading == 0
}

private var availableSpaceForWriting: Int {
return array.count - availableSpaceForReading
}

public var isFull: Bool {
return availableSpaceForWriting == 0
}
}

extension RingBuffer: CustomStringConvertible {
public var description: String {
let values = (0..<availableSpaceForReading).map {
String(describing: array[($0 + readIndex) % array.count]!)
}
return "[" + values.joined(separator: ", ") + "]"
}
}
优缺点

image-20190912162139308

基于环缓冲区的队列具有与链表实现相同的入队和出队时间复杂度。唯一的区别是空间复杂性。环形缓冲区具有固定大小,这意味着入队可能会失败。

用双栈来实现

1
2
3
4
5
6
7
8
9
10
11
12
13
14
15
16
17
18
19
20
21
22
23
24
25
26
27
28
29
30
31
32
33
34
35
36
37
38
39
40
41
42
43
44
public struct QueueStack<T> : Queue {

private var leftStack: [T] = []
private var rightStack: [T] = []
public init() {}

public var isEmpty: Bool {
return leftStack.isEmpty && rightStack.isEmpty
}

public var peek: T? {
return !leftStack.isEmpty ? leftStack.last : rightStack.first
}

public mutating func enqueue(_ element: T) -> Bool {
rightStack.append(element)
return true
}

public mutating func dequeue() -> T? {
if leftStack.isEmpty {
leftStack = rightStack.reversed()
rightStack.removeAll()
}
return leftStack.popLast()
}
}

extension QueueStack: CustomStringConvertible {

public var description: String {
let printList = leftStack.reversed() + rightStack
return String(describing: printList)
}
}

var queue = QueueStack<String>()
queue.enqueue("Ray")
queue.enqueue("Brian")
queue.enqueue("Eric")
queue
queue.dequeue()
queue
queue.peek

出队:image-20190912162831309

入队:

![image-20190912162918069](/Users/will/Library/Application Support/typora-user-images/image-20190912162918069.png)

优缺点
![image-20190912163001741](/Users/will/Library/Application Support/typora-user-images/image-20190912163001741.png)

与基于数组的实现相比,通过利用两个堆栈,您可以将dequeue(_ :)转换为分摊的O(1)操作。

此外,您的双栈实现是完全动态的,并且没有基于环形缓冲区的队列实现所具有的固定大小限制。

总结

  • 队列采用FIFO策略,首先必须先删除添加的元素。

  • Enqueue将元素插入队列的后面。

  • Dequeue删除队列前面的元素。

  • 数组中的元素在连续的内存块中布局,而链表中的元素更加分散,可能存在缓存未命中。

  • 基于环路缓冲区队列的实现适用于具有固定大小的队列。

  • 与其他数据结构相比,利用两个栈可以将出列dequeue(_ :)时间复杂度提高到摊销的O(1)操作。

  • 双栈实现在空间复杂度方面击败了链表。

第九章:队列挑战

解释栈和队列之间的区别

为每个数据结构提供两个实际示例。

画逐步图表

演示四种实现时,每一步对队列的有影响。

如队列为:”SWIFT”

1
2
3
4
5
6
7
enqueue("R") 
enqueue("O")
dequeue()
enqueue("C")
dequeue()
dequeue()
enqueue("K")

给队列添加next协议

用来大富翁游戏,指派下一个玩家

1
2
3
4
5
6
7
8
9
10
11
12
13
14
15
16
17
public protocol BoardGameManager {
associatedtype Player
mutating func nextPlayer() -> Player?
}

extension QueueArray: BoardGameManager {

public typealias Player = T

public mutating func nextPlayer() -> T? {
guard let person = dequeue() else {
return nil
}
enqueue(person)
return person
}
}

逆序排列队列

1
2
3
4
5
6
7
8
9
10
11
12
13
14
extension QueueArray {

func reversed() -> QueueArray {
var queue = self
var stack = Stack<T>()
while let element = queue.dequeue() {
stack.push(element)
}
while let element = stack.pop() {
queue.enqueue(element)
}
return queue
}
}

引言

写这本书的目的

每个开发人员都应该研究调试代码的艺术。 但是,有些人会从本书中获得更多。 本书是为:

  1. 希望更好地使用LLDB进行调试的开发人员

  2. 希望使用LLDB构建复杂调试命令的开发人员

  3. 希望深入了解Swift和Objective-C内部的开发人员

  4. 有兴趣了解:通过逆向工程,他们可以做些什么的开发人员

  5. 对现代主动逆向工程策略感兴趣的开发人员

  6. 希望在发现有关其计算机或软件问题的答案时有所帮助的开发人员

自定义LLDB脚本repo:

https://github.com/DerekSelander/LLDB

这些脚本将有助于您的调试/逆向工程,并为您自己的LLDB脚本提供新颖的想法。

第一节:开始LLDB命令

到本节结束时,您将能够使用调试器来执行调试所需的大多数基本任务,以及创建自己的简单自定义命令

第1章:入门

想知道为什么命令是po? po代表打印对象。 还有p,它只是打印RDI的内容。 po通常更有用,因为它提供了NSObject的描述或debugDescription方法(如果可用)。

如果您想将调试提升到一个新的水平,汇编(Assembly)是一项重要的技能。

它可以让您深入了解Apple的代码 - 即使您没有任何源代码可供阅读。 它将使您更好地了解Swift编译器团队如何使用Swift在Objective-C中跳出,并且它将使您更好地了解Apple设备上的一切是如何工作的。

如果可以,我将始终选择在调试器中使用Objective-C,因为使用Objective-C LLDB比使用Swift更稳定。

第2章:Help和Apropos

help将转储(dump)所有可用的命令,包括从〜/ .lldbinit加载的自定义命令。

1
(lldb) help breakpoint

apropos命令可以为您执行此操作;这有点像使用搜索引擎在网络上找到一些东西。

1
(lldb) apropos swift

第3章:使用LLDB Attaching

LLDB“Attaching”的短语实际上有点误导。 名为debugserver(位于Xcode.app/Contents/SharedFrameworks/LLDB.framework/Resources/)的程序负责附加(attaching)到目标进程。

如果它是远程进程,例如在远程设备上运行的iOS,watchOS或tvOS应用程序,则会在该远程设备上启动远程调试服务器。 LLDB的工作是启动,连接和协调调试服务器,以处理调试应用程序时的所有交互。

附加到现有进程

1
lldb -n Xcode

附加到未来的进程

1
lldb -n Finder -w

launch可选的参数

这告诉LLDB使用/bin/ls(文件列表命令)作为目标可执行文件。

1
lldb -f /bin/ls

使用 process 的选项 -w 更改工作目录

1
(lldb) process launch -w /Applications

直接传递参数给程序,也就是/bin/ls

1
(lldb) process launch -- /Applications

等价于

1
$ ls /Applications

-X选项可扩展您提供的任何shell参数,例如代字号。

1
(lldb) process launch -X true -- ~/Desktop

runprocess launch -X true —的缩写,所以

1
run ~/Desktop

stdin也有一个选项-i,用来处理标准的输入输出。

1
2
(lldb) target delete
(lldb) target create /usr/bin/wc
1
$ echo "hello world" > /tmp/wc_input.txt
1
2
3
4
(lldb) process launch -i /tmp/wc_input.txt
Process 24511 launched: '/usr/bin/wc' (x86_64)
1 2 12
Process 24511 exited with status = 0 (0x00000000)

等同于

1
2
$ wc < /tmp/wc_input.txt
1 2 12

第4章:在代码中停止

无论您是在技术堆栈中使用Swift,Objective-C,C ++,C还是完全不同的语言,您都需要学习如何创建断点。 可以轻松地在Xcode中单击侧面板以使用GUI创建断点,但LLDB控制台可以让您更好地控制断点。

Signals(信号)

Unix信号是进程间通信的基本形式。

例如,其中一个信号SIGSTOP可用于保存状态并暂停执行进程,而其对应的SIGCONT则被发送到程序以恢复执行。调试器可以使用这两个信号暂停并继续执行程序。

Xcode 断点

符号断点(Symbolic breakpoints)是Xcode的一个很好的调试功能。它们允许您在应用程序中的某个符号上设置断点。例如[NSObject init],它引用NSObject实例的init方法。

您将学习如何在第10章“汇编,寄存器和调用约定”中正确使用和操作寄存器,但是现?在,只需知道 arg1与​ $rdi寄存器同义,并且可以被认为是持有实例的调用init时的类。

还有Swift错误断点,它通过在swift_willThrow方法上创建断点来随时停止Swift抛出错误。如果您正在处理任何容易出错的API,这是一个很好的选择,因为它可以让您快速诊断情况,而不会对代码的正确性做出错误的假设。

LLDB断点语法

image命令是一个很好的工具,可以帮助内省对设置断点至关重要的细节。

1
(lldb) image lookup -n "-[UIViewController viewDidLoad]"
1
(lldb) image lookup -rn test
Objective-C properties
1
2
3
@interface TestClass : NSObject 
@property (nonatomic, strong) NSString *name;
@end
1
(lldb) image lookup -n "-[TestClass name]"
Objective-C properties and dot notation
1
2
3
4
5
6
7
8
9
10
TestClass *a = [[TestClass alloc] init];

// Both equivalent for setters
[a setName:@"hello, world"];
a.name = @"hello, world";

// Both equivalent for getters
NSString *b;
b = [a name]; // b = @"hello, world"
b = a.name; // b = @"hello, world"

重要的是要知道您是在处理Objective-C代码并尝试使用点表示法在setter和getter属性上创建断点。

Swift properties
1
2
3
class SwiftTestClass: NSObject { 
var name: String!
}

In the LLDB console, type the following:

1
(lldb) image lookup -rn Signals.SwiftTestClass.name.setter

You’ll get output similar to below:

1
2
3
4
5
1 match found in /Users/derekselander/Library/Developer/Xcode/ DerivedData/Signals-atqcdyprrotlrvdanihoufkwzyqh/Build/Products/Debugiphonesimulator/Signals.app/Signals:

Address: Signals[0x000000010000cc70] (Signals.__TEXT.__text + 44816)

Summary: Signals`Signals.SwiftTestClass.name.setter : Swift.ImplicitlyUnwrappedOptional<Swift.String> at SwiftTestClass.swift: 28

使用以下正则表达式查询同时搜索name属性的SwiftTestClass setter和getter:

1
(lldb) image lookup -rn Signals.SwiftTestClass.name

创建断点

有几种不同的方法可以创建断点。最基本的方法是只输入字母b,后跟断点名称。这在Objective-C和C中相当容易,因为名称简短且易于键入(例如 - [NSObject init]或 - [UIView setAlpha:])。输入C ++和Swift非常棘手,因为编译器会将您的方法转换为具有相当长名称的符号。

1
(lldb) b -[UIViewController viewDidLoad]

与许多速记命令一样,b是另一个更长的LLDB命令的缩写。

正则表达式断点和范围

rb命令将扩展到rbreak(假设您没有任何以“rb”开头的其他LLDB命令)。

1
(lldb) rb SwiftTestClass.name.setter

这将在包含短语name.setter的任何内容上生成断点:

1
(lldb) rb name\.setter	

在UIViewController的每个Objective-C实例方法上创建一个断点:

1
(lldb) rb '\-\[UIViewController\ '

删除所有断点:

1
(lldb) breakpoint delete

在断点中的UIViewController之后,这提供了带有一个或多个字母数字字符后跟空格的可选括号。

1
(lldb) rb '\-\[UIViewController(\(\w+\))?\ '

使用正则表达式断点可以使用单个表达式捕获各种断点。

您可以使用-f选项将断点的范围限制为特定文件。

如果您正在调试DetailViewController.swift,这将非常有用。它将在此文件中的所有属性getter / setter,块/闭包,扩展/类别和函数/方法上设置断点。 -f称为范围限制。

1
(lldb) rb . -f DetailViewController.swift

使用-s可以限制此共享库中设置断点。

1
(lldb) rb . -s UIKit

-o选项为此提供了解决方案。它创造了所谓的“一次性”断点。当这些断点命中时,断点将被删除。所以它只会打一次。

1
2
(lldb) breakpoint delete 
(lldb) rb . -s UIKit -o
其他很酷的断点选项

-L选项允许您按源代码的语言进行过滤。因此,如果您只想在Signals应用程序的Commons模块中使用Swift代码,则可以执行以下操作:

1
(lldb) breakpoint set -L swift -r . -s Commons

这将在Commons模块中的每个Swift方法上设置断点。

如果你想在Swift语句if let寻找一些有趣的东西,如果让它完全忘记你的应用程序在哪里,该怎么办?您可以使用源正则表达式断点来帮助确定感兴趣的位置!像这样:

1
(lldb) breakpoint set -A -p "if let"

这将在包含if let的每个源代码位置创建一个断点。 -A选项表示搜索项目已知的所有源文件。

如果想进一限制文件范围:

1
(lldb) breakpoint set -p "if let" -f MasterViewController.swift -f DetailViewController.swift

这将获取所有源文件(-A),但只过滤那些属于Signals可执行文件(使用-s Signals选项)的文件。

再来一个很酷的断点选项示例?好的。每当viewDidLoad被命中时,将创建一个打印UIViewController的断点,但是将通过LLDB控制台而不是符号断点窗口来执行此操作。然后将这个断点导出到文件中,这样就可以通过使用断点读取和断点写入命令展现给同事。

1
2
3
4
5
6
(lldb) breakpoint delete //清理断点
(lldb) breakpoint set -n "-[UIViewController viewDidLoad]" -C "po $arg1" -G1 // 打印所有符合条件的实例对象
(lldb) breakpoint write -f /tmp/br.json //断点写入文件
(lldb) platform shell cat /tmp/br.json //shell读取文件
(lldb) breakpoint delete //清理断点
(lldb) breakpoint read -f /tmp/br.json //还能从文件中导入断点
修改和移除断点

断点会从1开始分配ID

1
2
3
4
5
6
7
(lldb) b main
(lldb) breakpoint list 1
(lldb) breakpoint list 1 -b //简洁:没有位置(location)
(lldb) breakpoint list 1 3 //多个
(lldb) breakpoint list 1-3 //范围
(lldb) breakpoint delete 1 //删除
(lldb) breakpoint delete 1.1 //仅删除第一个子断点

第5章:表达式

格式化 p 和 po

po通常用于Swift和Objective-C代码中以打印出感兴趣的项目。这可以是对象中的实例变量,对象的本地引用或寄存器,如本书前面所述。它甚至可以是一个任意的内存引用 - 只要该地址有一个对象!

po实际上是expression -O -- 的简写表达式。 -O参数用于打印对象的描述。

1
2
3
4
5
6
7
8
9
10
11
(lldb) help po
Evaluate an expression on the current thread. Displays any returned
value with formatting controlled by the type's author. Expects 'raw'
input (see 'help raw-input'.)

Syntax: po <expr>

Command Options Usage:
po <expr>

'po' is an abbreviation for 'expression -O --'

po经常被忽视的兄弟p,是另一个省略-O选项的缩写,expression -- 。打印出的p的格式更依赖于LLDB类型系统。

1
2
3
4
5
6
7
8
9
10
11
(lldb) help p
Evaluate an expression on the current thread. Displays any returned
value with LLDB's default formatting. Expects 'raw' input (see 'help
raw-input'.)

Syntax: p <expr>

Command Options Usage:
p <expr>

'p' is an abbreviation for 'expression --'

例如:

1
2
3
4
5
6
7
8
9
10
11
12
override var description: String { 
return "Yay! debugging " + super.description
}

override var debugDescription: String {
return "debugDescription: " + super.debugDescription
}

override func viewDidLoad() {
super.viewDidLoad()
print("\(self)")
}

在viewDidLoad中添加Xcode断点:

1
(lldb) po self

输出:

1
debugDescription: Yay! debugging <Signals.MasterViewController: 0x7fb71fd04080>

Swift 和 Objective-C 调试上下(文contexts)

重要的是要注意调试程序时有两个调试上下文:非Swift调试上下文和Swift上下文。默认情况下,当您停止使用Objective-C代码时,LLDB将使用非Swift(Objective-C)调试上下文,而如果您在Swift代码中停止,则LLDB将使用Swift上下文。听起来合乎逻辑,对吧?

但是你也可以指定上下文:

1
(lldb) expression -l objc -O -- [UIApplication sharedApplication]

在这里,您告诉LLDB使用Objective-C的objc语言。如有必要,您还可以使用objc + +作为Objective-C ++。

用户定义变量

如前所述,LLDB将在打印对象时代表您自动创建局部变量。您也可以创建自己的变量。

但是记得名字前面加$

1
2
3
4
5
6
7
(lldb) po id $test = [NSObject new] 
(lldb) po $test
<NSObject: 0x60000001d190>
(lldb) expression -l swift -O -- $test //切换至Swift上下文,同样可用
<NSObject: 0x60000001d190>
(lldb) expression -l swift -O -- $test.description //但是不能期待一切都正常
error: <EXPR>:3:1: error: use of unresolved identifier '$test' $test.description ^~~~~

这是一个正在积极开发的领域,Objective-C和Swift之间通过LLDB的桥梁可能会随着时间的推移而有所改善。

在Xcoode创建符号断点:

1
Signals.MasterContainerViewController.viewDidLoad() -> ()

然后

1
2
3
(lldb) p self
(lldb) po $R0.title //$R0是上一步打印出来的self的变量的名字
(lldb) expression -l swift -- $R0.title = "new title" //还可以修改

通过键入continue或按Xcode中的播放按钮来恢复应用程序。就会发现标题已经更新为 ’new title‘

类型格式化(Type formatting)

LLDB的一个不错的选择是能够格式化基本数据类型的输出。这使得LLDB成为了解编译器如何格式化基本C类型的绝佳工具。当你正在探索汇编部分时,这是必须知道的,你将在本书后面做。

1
2
3
4
(lldb) expression -G x -- 10 //指定十进制格式化输出
(lldb) p/x 10 //十进制
(lldb) p/t 10 //二进制
(lldb) p/d 'D' //十进制
1
2
-G <gdb-format> ( --gdb-format <gdb-format> )
Specify a format using a GDB format specifier string.

输出格式的完整列表如下(取自https://sourceware.org/gdb/ onlinedocs / gdb / Output-Formats.html):

  • x:十六进制
  • d:十进制
  • u:无符号十进制
  • o:八进制
  • t:二进制
  • a:地址
  • c:字符常量
  • f:浮点型
  • s:字符串

如果这些格式不够,您可以使用LLDB的额外格式化程序,但您将无法使用GDB格式化语法。

1
2
(lldb) expression -f Y -- 1430672467
(int) $0 = 53 54 46 55 STFU
1
2
-f <format> ( --format <format> )
Specify a format to be used for display.

LLDB具有以下格式化程序(摘自http://lldb.llvm.org/varformats.html):

  • B:布尔值

  • b:二进制

  • y:字节

  • Y:ASCII字节

  • c:字符

  • C:可打印字符

  • F:复杂的浮点型(包含实部和虚部)

  • s:c-string

  • i:十进制

  • E:枚举

  • x:十六进制

  • f:浮点型

  • o:八进制

  • O:MacOS OSType

  • U:UTF-16

  • u:无符号十进制

  • p:指针

第6章:线程,帧和步进(Thread, Frame & Stepping Around)

您已经学习了如何创建断点,如何打印和修改值,以及如何在调试器中暂停时执行代码。但到目前为止,您已经处于高度干燥的状态,如何在调试器中移动并检查数据之外的数据。现在是时候了!

在本章中,您将学习如何在LLDB当前暂停时将调试器移入和移出功能。

这是一项关键技能,因为您经常需要在输入或退出代码片段时随时检查值。

(栈的第一课)Stack 101

当计算机程序执行时,它将值存储在堆和栈中。两者都有其优点。作为高级调试器,您需要充分了解这些工作原理。现在,让我们简要介绍一下这个栈。

栈是LIFO(后进先出)队列,用于存储对当前正在执行的代码的引用。这种LIFO排序意味着最近添加的任何内容都会被删除。想想一栈盘子。在顶部添加一个盘子,它将是你首先取下的盘子。

栈指针指向栈的当前顶部。在板块类比中,栈指针指向顶板,告诉您从哪里取下一块板,或者在哪里放下一块板。

image-20190628093457893

在此图中,高地址显示在顶部(0xFFFFFFFF),低地址显示在底部(0x00000000),显示栈将向下增长。

一些插图喜欢在底部具有高地址以与板类比匹配,因为栈将显示为向上增长。但是,我相信任何展示栈的图表都应显示从高地址向下增长,因为这会在以后讨论栈指针的偏移时引起较少的麻烦。

检查栈的帧

这里我将使用 iPhone X Simulator。

添加断点:

1
Signals.MasterViewController.viewWillAppear(Swift.Bool) -> ()

image-20190628094640418

在Debug Navigator面板中,将显示栈跟踪,显示栈帧列表,第一个是viewWillAppear(_ :)。接下来是Swift / Objective-C桥接方法,@objc MasterViewController.viewWillAppear(Bool) ->():。这个方法是自动生成的,所以Objective-C可以进入Swift代码。

之后,有一些来自UIKit的Objective-C代码栈帧。深入挖掘一下,你会看到一些属于CoreAnimation的C ++代码。更深入的是,你会看到一些方法都包含属于CoreFoundation的名称CFRunLoop。最后,最重要的是,main函数。

下面进入LLDB console:

1
(lldb) thread backtrace

也可以使用bt

1
2
3
4
5
6
7
8
9
10
11
12
13
14
15
16
17
18
19
20
21
22
23
24
25
26
27
(lldb) help bt
Show the current thread's call stack. Any numeric argument displays at
most that many frames. The argument 'all' displays all threads. Expects
'raw' input (see 'help raw-input'.)

Syntax: bt [<digit> | all]

'bt' is an abbreviation for '_regexp-bt'
(lldb) help thread backtrace
Show thread call stacks. Defaults to the current thread, thread indexes
can be specified as arguments.
Use the thread-index "all" to see all threads.
Use the thread-index "unique" to see threads grouped by unique call stacks.

Syntax: thread backtrace <cmd-options>

Command Options Usage:
thread backtrace [-c <count>] [-s <frame-index>] [-e <boolean>]

-c <count> ( --count <count> )
How many frames to display (-1 for all)

-e <boolean> ( --extended <boolean> )
Show the extended backtrace, if available

-s <frame-index> ( --start <frame-index> )
Frame in which to start the backtrace
1
2
3
4
5
6
7
8
9
10
11
12
13
14
15
16
17
18
19
20
21
22
23
24
25
26
27
28
29
30
(lldb) bt
* thread #1, queue = 'com.apple.main-thread', stop reason = breakpoint 1.1
* frame #0: 0x0000000107044301 Signals`MasterViewController.viewWillAppear(animated=false, self=0x00007f9a26e0a670) at MasterViewController.swift:54:5
frame #1: 0x0000000107044993 Signals`@objc MasterViewController.viewWillAppear(_:) at <compiler-generated>:0
frame #2: 0x0000000110fc9437 UIKitCore`-[UIViewController _setViewAppearState:isAnimating:] + 687
frame #3: 0x0000000110fc9995 UIKitCore`__52-[UIViewController _setViewAppearState:isAnimating:]_block_invoke + 265
frame #4: 0x000000010957b33a CoreFoundation`-[__NSSingleObjectArrayI enumerateObjectsWithOptions:usingBlock:] + 58
frame #5: 0x0000000110fc9729 UIKitCore`-[UIViewController _setViewAppearState:isAnimating:] + 1441
frame #6: 0x0000000110fc9ba2 UIKitCore`-[UIViewController __viewWillAppear:] + 131
frame #7: 0x0000000110f275c9 UIKitCore`-[UINavigationController _startTransition:fromViewController:toViewController:] + 868
frame #8: 0x0000000110f283b5 UIKitCore`-[UINavigationController _startDeferredTransitionIfNeeded:] + 896
frame #9: 0x0000000110f296a7 UIKitCore`-[UINavigationController __viewWillLayoutSubviews] + 150
frame #10: 0x0000000110f0a38d UIKitCore`-[UILayoutContainerView layoutSubviews] + 217
frame #11: 0x0000000111a939c1 UIKitCore`-[UIView(CALayerDelegate) layoutSublayersOfLayer:] + 1417
frame #12: 0x000000010ea1feae QuartzCore`-[CALayer layoutSublayers] + 173
frame #13: 0x000000010ea24b88 QuartzCore`CA::Layer::layout_if_needed(CA::Transaction*) + 396
frame #14: 0x000000010ea30ee4 QuartzCore`CA::Layer::layout_and_display_if_needed(CA::Transaction*) + 72
frame #15: 0x000000010e9a03aa QuartzCore`CA::Context::commit_transaction(CA::Transaction*) + 328
frame #16: 0x000000010e9d7584 QuartzCore`CA::Transaction::commit() + 608
frame #17: 0x00000001115deccb UIKitCore`__34-[UIApplication _firstCommitBlock]_block_invoke_2 + 128
frame #18: 0x0000000109592aec CoreFoundation`__CFRUNLOOP_IS_CALLING_OUT_TO_A_BLOCK__ + 12
frame #19: 0x00000001095922b0 CoreFoundation`__CFRunLoopDoBlocks + 336
frame #20: 0x000000010958cb34 CoreFoundation`__CFRunLoopRun + 1252
frame #21: 0x000000010958c302 CoreFoundation`CFRunLoopRunSpecific + 626
frame #22: 0x000000010e8e22fe GraphicsServices`GSEventRunModal + 65
frame #23: 0x00000001115c5ba2 UIKitCore`UIApplicationMain + 140
frame #24: 0x000000010704b88b Signals`main at AppDelegate.swift:32:7
frame #25: 0x000000010af06541 libdyld.dylib`start + 1
(lldb) frame info
frame #0: 0x0000000107044301 Signals`MasterViewController.viewWillAppear(animated=false, self=0x00007f9a26e0a670) at MasterViewController.swift:54:5

如您所见,此输出与Debug Navigator中找到的内容相匹配。那么,如果您只是从Debug Navigator中看到所有内容,为什么这甚至很重要?好吧,使用LLDB控制台可以对您想要查看的信息进行细致的控制。此外,您将制作自定义LLDB脚本,其中这些命令将变得非常有用。知道Xcode从哪里获取信息也很好,对吧?

然后:

1
2
(lldb) frame select 1
frame #1: 0x0000000107044993 Signals`@objc MasterViewController.viewWillAppear(_:) at <compiler-generated>:0

记下汇编中的绿线。在该行之前是负责执行viewWillAppear(_:)callq指令,您在之前设置了断点。

不要让汇编太模糊你的眼睛。你还没有走出汇编树林……

步进

掌握LLDB时,您可以在程序暂停时执行的三个最重要的导航操作围绕着逐步执行程序。通过LLDB,您可以跳过(step over),单步执行(step in)或退出(step out)代码。

跳过
1
2
(lldb) run //'run' is an abbreviation for 'process launch -X true --'
(lldb) next //'next' is an abbreviation for 'thread step-over'
单步执行
1
(lldb) step //'step' is an abbreviation for 'thread step-in'
退出
1
(lldb) finish //'finish' is an abbreviation for 'thread step-out'

请记住,只需按Enter键,LLDB将执行您输入的最后一个命令。

Xcode 界面中步进

虽然使用控制台可以获得更加精细的控制,但Xcode已经为LLDB控制台上方的按钮提供了这些选项。

检查栈中的数据

frame 命令的一个非常有趣的选项是 frame variable 子命令。

此命令将获取可执行文件头中的调试符号信息(如果您的应用程序被剥离,则为dYSM …稍后会详细介绍)并转储该特定栈帧的信息。由于调试信息,frame variable命令可以使用适当的选项轻松告诉您函数中所有变量的范围以及程序中的任何全局变量。

1
2
(lldb) frame variable
(lldb) frame variable -F self //以平面格式打印结果
1
2
-F ( --flat )
Display results in a flat format that uses expression paths for each variable or member.

image-20190701112507258

提供有关Apple私有API的ivars的更多信息,而不是Variables View。

第7章:镜像(Image)

现在是时候探索通过LLDB的权力找到感兴趣代码的最佳工具之一。在本章中,您将深入了解image命令。

image命令是target modules子命令的别名。image命令专门查询 module 信息;也就是说,代码在进程中加载和执行。Module 可以包含许多东西,包括主要的可执行文件(main executables),框架(framework)或插件(plugin)。但是,这些module中的大多数通常以动态库(dynamic libraries)的形式出现。动态库的示例包括适用于iOS的UIKit或适用于macOS的AppKit。

Module

1
2
3
(lldb) image list 
(lldb) image list Foundation
[ 0] FD4BF3C6-63C9-3A30-BEEA-D39F6F8EEB13 0x0000000107d70000 /Applications/Xcode.app/Contents/Developer/Platforms/iPhoneOS.platform/Developer/Library/CoreSimulator/Profiles/Runtimes/iOS.simruntime/Contents/Resources/RuntimeRoot/System/Library/Frameworks/Foundation.framework/Foundation

这是一种有用的方法,可以找到有关所需module的信息。

让我们来探索这个输出。 那里有一些有趣的东西:

  1. 首先打印module的UUID(FD4BF3C6-63C9-3A30-BEEA-D39F6F8EEB13)。UUID对于搜索符号信息和唯一标识Foundation module的版本非常重要。

  2. 在UUID之后是加载地址(0x0000000107d70000)。 这标识将Foundation module加载到Signals可执行文件的进程空间中。

  3. 最后,您拥有module在磁盘上所在位置的完整路径。

1
(lldb) image dump symtab UIKitCore -s address

这将转储UIKitCore可用的所有符号表信息。由于-s address参数,此命令按私有UIKitCore模块中实现函数的地址对输出进行排序。

但是可读性不佳,需要另外一个命令来搜索:

1
2
3
4
(lldb) image lookup -n "-[UIViewController viewDidLoad]"
1 match found in /Applications/Xcode.app/Contents/Developer/Platforms/iPhoneOS.platform/Developer/Library/CoreSimulator/Profiles/Runtimes/iOS.simruntime/Contents/Resources/RuntimeRoot/System/Library/PrivateFrameworks/UIKitCore.framework/UIKitCore:
Address: UIKitCore[0x000000000034adf9] (UIKitCore.__TEXT.__text + 3443497)
Summary: UIKitCore`-[UIViewController viewDidLoad]

这将转储与UIViewController的viewDidLoad实例方法相关的信息。

如果想用正则来模糊搜索:

1
(lldb) image lookup -rn UIViewController

但是这还不够,因为结果包含了UIViewControllerBuiltinTransitionViewAnimator,这并不是我们想要的,所改为:

1
2
(lldb) image lookup -rn '\[UIViewController\ '
(lldb) image lookup -rn \[UIViewController\s //等价的

但是如果搜索Category,命名规则:UIViewController(CategoryName),改进如下:

1
(lldb) image lookup -rn '\[UIViewController\(\w+\)\ '

当然这些都是参考正则表达式的规则,然后用在实际的需求中。

寻找代码

您可以使用上面的image lookup命令找到UIViewController方法。您还使用它来寻找第4章“在代码中停止”中如何命名Swift属性setter和getter。

但是Block如何搜索呢?如下面例子

1
2
3
dispatch_once(&onceToken, ^{
sharedSignalHandler = [[UnixSignalHandler alloc] initPrivate];
});

我们先在Xcode添加断点,然后:

1
2
(lldb) frame info
frame #0: 0x00000001048e1250 Commons`__34+[UnixSignalHandler sharedHandler]_block_invoke(.block_descriptor=0x00000001048e8230) at UnixSignalHandler.m:72:28

可以看到完整的函数名: __34+[UnixSignalHandler sharedHandler]_block_invoke

让我们先试试:

1
(lldb) image lookup -rn _block_invoke

结果太多,添加范围限制:

1
(lldb) image lookup -rn _block_invoke Commons

现在创建断点:

1
(lldb) rb appendSignal.*_block_invoke -s Commons

之后我回到终端:

1
pkill -SIGIO Signals

就会触发刚刚创建的断点:

1
2
3
4
5
6
7
8
9
10
11
12
13
14
15
16
2019-07-01 14:16:15.922561+0800 Signals[7583:429444] Appending new signal: SIGIO
(lldb) frame variable
(__block_literal_5 *) .block_descriptor = 0x0000600002f1d580
(int) sig = <read memory from 0x41 failed (0 of 4 bytes read)>

(siginfo_t *) siginfo = <read memory from 0x39 failed (0 of 8 bytes read)>

(UnixSignalHandler *const) self = <read memory from 0x31 failed (0 of 8 bytes read)>

(lldb) next
(lldb) frame variable
(__block_literal_5 *) .block_descriptor = 0x0000600002f1d580
(int) sig = 23
(siginfo_t *) siginfo = 0x00007ffeecdd9e78
(UnixSignalHandler *) self = 0x0000600002f091c0
(UnixSignal *) unixSignal = 0x0000000106ca4454

您需要跳过一个语句,因此块执行了一些初始逻辑来设置函数,也称为函数序言(function prologue)。函数序言是与汇编相关的主题,您将在第II节中了解。

这实际上非常有趣。首先,您会看到一个block的对象,正在调用的。然后有sig和siginfo参数传递给Objective-C方法,在该方法中调用此块。这些如何传递到block中?

好吧,当创建一个block时,编译器足够聪明,可以确定它正在使用哪些参数。然后它创建一个将这些作为参数的函数。调用块时,调用此函数,并传入相关参数。

1
2
3
4
5
6
7
8
9
10
11
12
(lldb) image lookup -t __block_literal_5
Best match found in /Users/will/Library/Developer/Xcode/DerivedData/Signals-bgjklehkjddsnxcexztwhrufpsbn/Build/Products/Debug-iphonesimulator/Signals.app/Frameworks/Commons.framework/Commons:
id = {0x100000be1}, name = "__block_literal_5", byte-size = 52, decl = UnixSignalHandler.m:127, compiler_type = "struct __block_literal_5 {
void *__isa;
int __flags;
int __reserved;
void (*__FuncPtr)();
__block_descriptor_withcopydispose *__descriptor;
UnixSignalHandler *const self;
siginfo_t *siginfo;
int sig;
}"

这是定义block的对象!

正如您所看到的,这几乎与头文件一样好,可以告诉您如何在block中导航内存。如果将内存中的引用转换为__block_literal_5类型,则可以轻松打印出block引用的所有变量。

1
2
3
4
5
6
7
8
9
10
11
12
13
14
15
16
17
18
19
20
(lldb) po ((__block_literal_5 *)0x0000600002f1d580)
<__NSMallocBlock__: 0x600002f1d580>
(lldb) p/x ((__block_literal_5 *)0x0000600002f1d580)->__FuncPtr
(void (*)()) $1 = 0x0000000103143a80 (Commons`__38-[UnixSignalHandler appendSignal:sig:]_block_invoke_2 at UnixSignalHandler.m:127)
(lldb) image lookup -a 0x0000000103143a80
Address: Commons[0x0000000000001a80] (Commons.__TEXT.__text + 2240)
Summary: Commons`__38-[UnixSignalHandler appendSignal:sig:]_block_invoke_2 at UnixSignalHandler.m:127
(lldb) po ((__block_literal_5 *)0x0000600002f1d580)->sig //打印出传递给block的所有参数
23
(lldb) p *(__block_literal_5 *)0x0000600002f1d580 //可以使用p命令转储完整的结构并解除引用指针
(__block_literal_5) $4 = {
__isa = 0x0000000106d6e170
__flags = -1023410174
__reserved = 0
__FuncPtr = 0x0000000103143a80 (Commons`__38-[UnixSignalHandler appendSignal:sig:]_block_invoke_2 at UnixSignalHandler.m:127)
__descriptor = 0x000000010314a2c0
self = 0x0000600002f091c0
siginfo = 0x00007ffeecdd9e78
sig = 23
}

深入研究(Snooping around)

好的,您已经发现了如何以静态方式检查私有类的实例变量,但是该块内存地址太过诱人而无法置之不理。 尝试将其打印出来并使用动态分析进行探索。

直接打印block的内存地址:

1
2
3
4
5
6
7
8
9
10
11
12
13
14
15
16
17
18
19
20
21
22
23
24
25
26
(lldb) po 0x0000600002f1d580
<__NSMallocBlock__: 0x600002f1d580>
(lldb) image lookup -rn __NSMallocBlock__ // 没有结果
(lldb) po [__NSMallocBlock__ superclass]
__NSMallocBlock
(lldb) image lookup -rn __NSMallocBlock
5 matches found in /Applications/Xcode.app/Contents/Developer/Platforms/iPhoneOS.platform/Developer/Library/CoreSimulator/Profiles/Runtimes/iOS.simruntime/Contents/Resources/RuntimeRoot/System/Library/Frameworks/CoreFoundation.framework/CoreFoundation:
Address: CoreFoundation[0x000000000018b600] (CoreFoundation.__TEXT.__text + 1614448)
Summary: CoreFoundation`-[__NSMallocBlock retain] Address: CoreFoundation[0x000000000018b620] (CoreFoundation.__TEXT.__text + 1614480)
Summary: CoreFoundation`-[__NSMallocBlock release] Address: CoreFoundation[0x000000000018b630] (CoreFoundation.__TEXT.__text + 1614496)
Summary: CoreFoundation`-[__NSMallocBlock retainCount] Address: CoreFoundation[0x000000000018b640] (CoreFoundation.__TEXT.__text + 1614512)
Summary: CoreFoundation`-[__NSMallocBlock _tryRetain] Address: CoreFoundation[0x000000000018b650] (CoreFoundation.__TEXT.__text + 1614528)
Summary: CoreFoundation`-[__NSMallocBlock _isDeallocating]

(lldb) po [__NSMallocBlock superclass]
NSBlock

(lldb) image lookup -rn 'NSBlock\ '
6 matches found in /Applications/Xcode.app/Contents/Developer/Platforms/iPhoneOS.platform/Developer/Library/CoreSimulator/Profiles/Runtimes/iOS.simruntime/Contents/Resources/RuntimeRoot/System/Library/Frameworks/CoreFoundation.framework/CoreFoundation:
Address: CoreFoundation[0x000000000018b4c0] (CoreFoundation.__TEXT.__text + 1614128)
Summary: CoreFoundation`+[NSBlock allocWithZone:] Address: CoreFoundation[0x000000000018b4e0] (CoreFoundation.__TEXT.__text + 1614160)
Summary: CoreFoundation`+[NSBlock alloc] Address: CoreFoundation[0x000000000018b500] (CoreFoundation.__TEXT.__text + 1614192)
Summary: CoreFoundation`-[NSBlock copy] Address: CoreFoundation[0x000000000018b510] (CoreFoundation.__TEXT.__text + 1614208)
Summary: CoreFoundation`-[NSBlock copyWithZone:] Address: CoreFoundation[0x000000000018b520] (CoreFoundation.__TEXT.__text + 1614224)
Summary: CoreFoundation`-[NSBlock invoke] Address: CoreFoundation[0x000000000018b530] (CoreFoundation.__TEXT.__text + 1614240)
Summary: CoreFoundation`-[NSBlock performAfterDelay:]

您现在将尝试在block上调用此方法。但是,当保留此block的引用释放其控制时,您不希望块消失,从而降低retainCount,并可能释放block。

有一种简单的方法来保持这个block - 只需 retain 它!在LLDB中键入以下内容,将地址替换为block的地址:

1
2
3
4
5
6
7
(lldb) po id $block = (id)0x0000600002f1d580
(lldb) po [$block retain]
<__NSMallocBlock__: 0x600002f1d580>

(lldb) po [$block invoke]
2019-07-01 16:05:33.855039+0800 Signals[7583:452921] Appending new signal: SIGIO
nil

这表明你已经再次调用了block!

这种用于探索公共和私有类,然后探索它们实现的方法的方法,是了解程序覆盖范围内的内容的好方法。稍后您将对方法使用相同的发现过程,然后分析这些方法执行的程序集,为您提供原始方法源代码的非常接近的近似值。

Private debugging methods

image lookup 命令可以很好地搜索私有方法以及您在Apple开发职业生涯中看到的公共方法。

但是,在调试自己的代码时,有一些隐藏的方法非常有用。

例如,以_开头的方法通常表示自己是一个私有(也可能是重要的!)方法。

让我们尝试在所有以下划线字符开头的模块中搜索任何Objective-C方法,并在其中包含单词“description”。

如果您在阅读此行代码时有些迷惑不解,强烈建议您仔细阅读 https://docs.python.org/2/library/re.html 以了解正则表达式查询;从现在开始,它只会变得更加复杂。

1
2
3
4
5
(lldb) image lookup -rn (?i)\ _\w+description\] //不区分大小写
(lldb) image lookup -rn NSObject\(IvarDescription\)
(lldb) po [[UIApplication sharedApplication] _ivarDescription]
(lldb) image lookup -rn '\[UIStatusBar\ set' //查找所以set开头方法
(lldb) po (BOOL)[[UIStatusBar class] isSubclassOfClass:[UIView class]]

通过地址调用对象:

1
2
3
4
5
(lldb) po [[UIApplication sharedApplication] statusBar]
<UIStatusBar_Modern: 0x7f9965e03f00; frame = (0 0; 375 44); autoresize = W+BM; layer = <CALayer: 0x6000025dd640>>

(lldb) po [0x7f9965e03f00 setBackgroundColor:[UIColor purpleColor]]
purpleColor

未完待续

0%