第一章:引言 Kitura是什么?
在词源学上,Kitura这个词松散地源于希伯来语Keturah,字面意思是“香”。
为什么选择Swift写后端?
支持为服务器编写Swift的核心论点是在应用程序的前端和后端之间共享代码和知识。如果你是一个团队,这种精简可以说是更加关键和赋权。这包括但不限于模型对象代码。
BFF(Backonnd for Frontend)是一种设计模式,很快就会成为你最好的朋友(永远?)。
这个模式在这个特定用例中起作用的几个原因:
你可以确定从此API发出请求的唯一设备将是iOS设备。这意味着你可以更少担心平衡请求负载。
你可以更好地控制对iOS设备的响应中的数据。在此之前,你可能已经等待后端开发人员最终帮助你,并根据User-Agent首部有条件地修剪响应数据。现在,你可以让后端开发人员不间断地工作,并通过将响应数据解析为你的BFF设备所需的内容来解决你的问题。
在我们的特定用例中,你可以在发送响应之前保存一个用户可能对数据库进行的查询的响应。这意味着,如果其他人在相同的位置请求餐馆信息(例子是请求包含地理位置的餐馆信息),并且存储的数据足够新以满足你的刷新策略,你甚至不必向主服务器发送查询!你只需发送缓存的数据,并相信它对你的用户来说足够新。
你可以使用你已经知道如何在Swift中编写代码的语言完成1-3!
第二章:Hello, World! 如何Kitura项目
先安装Kitura macOS App和Kitura CLI
1
2
brew tap ibm-swift/kitura brew install kitura
1
2
3
4
5
6
7
8
9
10
11
12
13
14
15
16
17
18
kitura Usage: kitura [options] [command] Kitura command-line interface Options: -V, --version output the version number -h, --help output usage information Commands: build build the project in a local container create interactively create a Kitura project idt install IBM Cloud Developer Tools init scaffold a bare-bones Kitura project kit print Cocoapods boilerplate for KituraKit run run the project in a local container sdk generate a client SDK from an OpenAPI/Swagger spec help [cmd] display help for [cmd]
创建的Kitura项目提供了一个开箱即用的全功能Kitura应用程序。 它提供了在生产环境中运行的任何应用程序可能需要的一些功能,包括:
使用HeliumLogger记录信息,警告和错误消息。
使用CloudEnvironment进行动态配置查找和设置。
使用Health查看和报告应用程序健康状况。
使用SwiftMetrics进行App和Kitura框架指标和监控。
项目使用SPM管理依赖
1 2 3 4 5 6 7 8 9 10 11 12 13 14 15 16 17 18 19 20 import PackageDescriptionlet package = Package ( name: "EmojiJournalServer" , dependencies: [ .package(url: "https://github.com/IBM-Swift/Kitura.git" , .upToNextMinor(from: "2.5.0" )), .package(url: "https://github.com/IBM-Swift/HeliumLogger.git" , from: "1.7.1" ), .package(url: "https://github.com/IBM-Swift/CloudEnvironment.git" , from: "9.0.0" ), .package(url: "https://github.com/RuntimeTools/SwiftMetrics.git" , from: "2.0.0" ), .package(url: "https://github.com/IBM-Swift/Health.git" , from: "1.0.0" ), ], targets: [ .target(name: "EmojiJournalServer" , dependencies: [ .target(name: "Application" ), "Kitura" , "HeliumLogger" ]), .target(name: "Application" , dependencies: [ "Kitura" , "CloudEnvironment" ,"SwiftMetrics" ,"Health" , ]), .testTarget(name: "ApplicationTests" , dependencies: [.target(name: "Application" ), "Kitura" ,"HeliumLogger" ]) ] )
Application.swift包含应用程序的生命周期处理,提供emojiJournalServer目标中main.swift使用的核心init()和run()方法来启动应用程序。
1
2
3
4
5
6
7
8
9
10
11
12
13
14
15
16
17
18
19
20
21
22
23
24
25
26
27
28
29
30
31
32
33
34
35
36
37
import Foundationimport Kituraimport LoggerAPIimport Configurationimport CloudEnvironmentimport KituraContractsimport Healthpublic let projectPath = ConfigurationManager .BasePath .project.pathpublic let health = Health ()public class App { let router = Router () let cloudEnv = CloudEnv () public init () throws { initializeMetrics(router: router) } func postInit () throws { initializeHealthRoutes(app: self ) router.get("/" , handler: helloWorldHandler) } func helloWorldHandler (request : RouterRequest , response : RouterResponse , next : ()->()) { response.send("Hello, World!" ) next() } public func run () throws { try postInit() Kitura .addHTTPServer(onPort: cloudEnv.port, with: router) Kitura .run() } }
运行后
欢迎页:http://localhost:8090
健康:http://localhost:8090/health
监控仪表板:http://localhost:8090/swiftmetrics-dash
HTTP吞吐量视图使用每秒请求(RPS)度量标准显示在任何时间点发生的请求量。
http://localhost:8090/metrics
使用Docker在Linux上运行应用程序
Docker和Kubernetes是Kitura部署的核心,它们提供了重要的性能和扩展优势。
第三章:RESTful APIs 在开始构建这些RESTful API之前,将了解RESTful API本身,包括它们的架构方法和设计原则。
REpresentational State Transfer (REST) REpresentational State Transfer(REST)是一种架构风格或设计模式的API。 如果一个API符合Roy Fielding博士在他的2000年论文“架构风格和基于网络的软件架构设计”中提出的一系列约束,那么它就是RESTful。
Fielding提出了以下六个限制:
客户端 - 服务器
RESTful API在客户端和服务器之间提供明确的分离,允许客户端和服务器彼此独立地开发。这种分离使得为同一服务器实现多个客户端成为可能,就像你为EmojiJournal创建iOS和Web应用程序客户端时所做的那样。
无状态
RESTful API应该是无状态的。每个请求都应该是自包含的,并且不应该依赖于存储在服务器上的先前请求的任何会话上下文。
可缓存
由于RESTful API是无状态和自包含的,因此可以将请求的结果缓存到RESTful API。这可以由客户端或诸如web代理之类的中介来完成。
设计良好的RESTful API应该鼓励尽可能存储可缓存的数据,对请求的响应被隐式或显式标记为可缓存,可缓存到特定时间(expires-at)或不可缓存。
分层系统
RESTful API可以是分层的,因此客户端不知道它是直接连接到API本身还是通过代理或负载均衡器间接连接。另外,API本身可以由服务器系统本身内的若干层或源组成和构建。
按需代码(可选)
RESTful API可以提供可以直接在客户端上运行的功能。实际上,这通常仅限于在浏览器中运行的JavaScript或Java Applet。
统一界面
RESTful API最重要的概念之一是资源的使用。资源可以是API可以提供有关信息的任何对象,例如你将使用的JournalEntry资源。
提供统一接口的RESTful API必须满足以下四个约束:
请求必须确定他们采取行动的资源。
请求和响应必须使用资源的表示。
消息必须是自描述的,自包含的,并且只能使用标准操作。
资源必须通过链接连接到其他资源。
另请注意,没有提及HTTP和Web请求。虽然RESTful API最常使用HTTP实现,但这不是必需的。也就是说,我们将仅介绍如何使用标准HTTP操作构建RESTful API,我们接下来将简要介绍HTTP本身。
HyperText Transfer Protocol (HTTP) 超文本传输协议(HTTP)是一种客户端 - 服务器,基于请求 - 响应的协议,是网站和基于Web的流量的基础。 因此,它受到客户端和服务器的普遍支持。
HTTP-based RESTful APIs URL作为资源 统一接口的第一个要求是请求标识它们所依赖的资源。在HTTP中,这是通过RESTful API使用请求的URL实现的。
例如:
特定资源的URL编码标识符 将提供这些URL以使客户端能够与所有日记帐分录和特定日记帐分录进行交互:
1 2 /entries /entries/<identifier>
用于资源组的URL编码查询参数 你可能还希望提供与资源子集的API。 这再次通过URL完成,这次使用URL查询参数。
URL查询参数以?开头。 他们可以使用<key> = <value>格式的键值对传递有关资源的任何其他信息。 可以使用键值对之间的&分隔符聚合和传递多个键值对。
1 2 3 /entries /entries?emoji=<emoji>&date=<date> /entries/<idenfifier>
分层API的分层URL RESTful URL也可以是分层的。 在你的EmojiJournal应用程序中,你只会支持拥有单个EmojiJournal的用户。 但是,假设你希望支持拥有多个期刊的用户,每个期刊都有自己的日记帐分录。
1 2 3 4 /journals /journals/<identifier> /journals/<identifier>/entries /journals/<identifier>/entries?emoji=<emoji>&date=<date> /journals/<identifier>/entries/<identifier>
例如,对以下URL的客户端请求将与日记2中的条目20进行交互:
资源表示 回想一下,统一接口的第二个概念是请求和响应应该使用资源的表示。 这是通过在HTTP正文数据中编码资源的表示,在基于HTTP的RESTful API中实现的。
HTTP消息,无论是请求还是响应,基本上由两部分组成:一组标题和正文数据。 为了完整性,响应还包含一个状态代码,用于报告请求的状态。
HTTP首部和正文数据 HTTP首部为请求和响应提供了额外的元数据。 首部在请求或响应开始时传输,并存储为键值对,一些首部允许多个值。
你可以使用HTTP首部存储你希望的任何其他信息。 你应该了解两个正式定义的标准标题,请参阅https://www.w3.org/Protocols/rfc2616/rfc2616-sec14.html (由正式的核心RFC规范定义),以及不太正式但广泛使用的非标准的首部,请参阅https://en.wikipedia.org/wiki/List_of_HTTP_header_fields#Common_non-standard_request_fields 。
标准头用于传递诸如Cookie,授权,ContentType(描述正文数据的媒体类型)和Content-Length(以字节为单位描述正文数据长度)等信息。
HTTP消息正文包含与请求或响应关联的数据。 在响应对网页的请求的情况下,正文数据包含网页本身的来源。 看一下对Hello,World的请求生成的HTTP响应! 你在上一章中创建的应用程序。
正文数据中的资源表示 如前所述,RESTful API对返回的HTTP正文数据中的资源表示进行编码。 身体通常由三部分组成:
Content-Type首部
Content-Type首部表示用于表示正文数据中的资源的编码。最常用的方法是使用JavaScript Object Notation(JSON)对表示进行编码,并将Content-Type首部设置为application/json。有时与RESTful API一起使用的身体数据编码的其他示例包括Protobuf,Thrift和Avro。
接受首部(仅限请求)
接受首部指示客户端将接受响应的编码。这通常是application/json,但它也可以包含编码列表。例如,如果客户端在JSON和Protobuf中都接受了响应,则此值可能设置为:application/json;application/protobuf。
编码的正文数据
最后,使用Content-Type首部中设置的编码将资源本身编码为正文数据。在最常见的application/json场景中,这是资源的JSON表示。 JSON的细节取决于特定资源的模型。例如,在本书后面稍后,JournalEntry的资源将包含id,emoji和date,类似于:
1 2 3 4 5 { "id" : "1" , "emoji" : "😊 " , "date" : "2018-09-18T00:07:01Z" }
自我描述性的信息 你已经了解了资源的识别和表示,但你如何对这些资源进行操作?
统一接口的第三个原则解决了这个问题。 它规定请求和响应都应该是自描述的,并且它们仅使用客户端和服务器都理解的标准操作。 在基于HTML的RESTful API中,这是通过使用特定的HTTP方法实现的。
RFC 2616概述了八种HTTP方法:OPTIONS,GET,HEAD,POST,PUT,DELETE,TRACE和CONNECT。
通过链接连接资源 统一接口的第四个也是最后一个概念是资源应该通过链接连接到其他资源。
如你所见,基于HTTP的RESTful API使用URL和基于URL的标识符来提供对资源的访问并指定单个资源。 因此,资源之间的链接只是进一步的RESTful URL和链接到连接资源的基于URL的标识符。
有两种常见的场景需要URL或标识资源:
请求的资源引用另一个(子或相关)资源。
你需要知道资源的标识符。
构建RESTful API
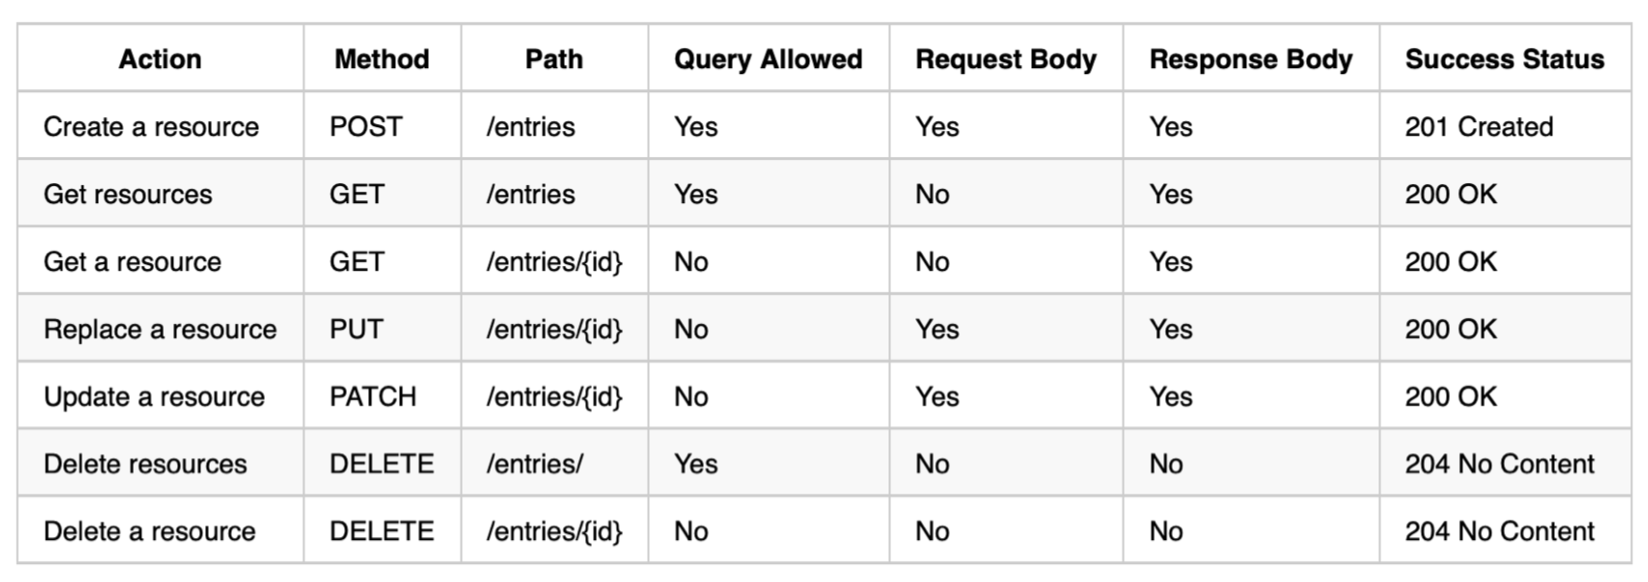
到目前为止,你已经学会了所有基础知识。 当你了解有关设计和实现RESTful API的更多信息时,你会发现除了我们在此处介绍的范围之外还有其他最佳实践。 这包括设置正确的Content-Type和Accepts标头,为成功创建设置Location标头,并为请求中的任何故障设置正确的HTTP状态代码。
此外,需要对请求和响应主体进行编码和解码,最常见的是来自JSON。 这曾经是一项艰巨的任务。 由于强大的Codable协议,Swift使JSON优雅且无痛。
第四章:Codable简介 Codable协议是Swift编程语言最强大的功能之一。 在一个句子中,当你扩展对象以符合Codable时,你可以使该对象自动序列化为任何外部可读格式,例如JSON,XML或协议缓冲区。
The bare necessities 直接看一个例子
1 2 3 4 5 6 7 8 9 10 11 12 13 14 15 16 17 18 19 20 21 22 23 24 25 26 27 28 29 30 31 32 33 34 35 36 37 38 39 40 41 42 43 44 45 46 47 48 49 50 51 52 53 54 55 56 57 58 59 60 import Foundationpublic struct Song : Codable { var title: String var length: Int enum CodingKeys : String , CodingKey { case title = "songTitle" case length = "songLength" } } public struct Animal : Codable { var name: String var age: Int ? var isFriendly: Bool var birthday: Date var songs: [Song ] } let baloo = Animal (name: "Baloo" , age: 5 , isFriendly: true , birthday: Date (), songs: [Song (title: "The Bare Necessities" , length: 180 )]) let bagheera = Animal (name: "Bagheera" , age: nil , isFriendly: true , birthday: Date (), songs: [Song (title: "Jungle's No Place For A Boy" , length: 95 )]) let encoder = JSONEncoder ()encoder.keyEncodingStrategy = .convertToSnakeCase encoder.dateEncodingStrategy = .iso8601 let decoder = JSONDecoder ()decoder.keyDecodingStrategy = .convertFromSnakeCase decoder.dateDecodingStrategy = .iso8601 do { let encodedBaloo = try encoder.encode(baloo) if let balooString = String (data: encodedBaloo, encoding: .utf8) { print (balooString) } let encodedBagheera = try encoder.encode(bagheera) if let bagheeraString = String (data: encodedBagheera, encoding: .utf8) { print (bagheeraString) } let decodedBaloo = try decoder.decode(Animal .self , from: encodedBaloo) print (decodedBaloo) let decodedBagheera = try decoder.decode(Animal .self , from: encodedBagheera) print (decodedBagheera) } catch let error { print ("Error occurred: \(error.localizedDescription) " ) }
第五章:Codable Routing Codable Routing支持以完全类型安全的方式在你的应用程序的结构和类以及HTTP请求和响应中使用的正文数据之间自动转换。 它大大减少了构建路由处理程序时需要编写的代码,并使Kitura能够代表你执行数据验证和错误处理。
看Model和Route的实现:
1 2 3 4 5 6 7 import Foundationstruct JournalEntry : Codable { var id: String ? var emoji: String var date: Date }
1 2 3 4 5 6 7 8 9 10 11 12 13 14 15 16 17 18 19 20 21 22 23 24 25 26 27 28 29 30 31 import Foundationimport LoggerAPIimport Kituravar entries: [JournalEntry ] = []func initializeEntryRoutes (app : App ) { app.router.get("/entries" , handler: getAllEntries) app.router.post("/entries" , handler: addEntry) app.router.delete("/entries" , handler: deleteEntry) Log .info("Journal entry routes created" ) } func addEntry (entry : JournalEntry , completion : @escaping (JournalEntry ?, RequestError ?) -> Void ) { var storedEntry = entry storedEntry.id = entries.count.value entries.append(storedEntry) completion(storedEntry, nil ) } func getAllEntries (completion : @escaping ([JournalEntry ]? , RequestError ?) -> Void ) -> Void { completion(entries, nil ) } func deleteEntry (id : String , completion : @escaping (RequestError ?) -> Void ) { guard let index = entries.index(where: { $0 .id == id }) else { return completion(.notFound) } entries.remove(at: index) completion(nil ) }
Codable Routing的一个独特功能是它只需要你在处理函数中定义你希望从请求中接收的值,以及你将通过完成处理程序添加到响应中的值。
目前,Kitura仅支持从application/json解码。 这意味着,实际上,Content-Type当前必须始终设置为application/json。 但是,Kitura团队计划在即将发布的版本中支持其他编码类型。
第六章:OpenAPI规范 Swagger的目标 在Tony Tam开创性的开源项目的基础上,其他公司开始做出贡献。 最终,Linux基金会承担了该项目的赞助,并将其名称更改为OpenAPI Initiative。 这种广泛的支持使OpenAPI规范在开源软件开发中占据了非常突出的位置。
当Tony开始研究Swagger API项目时,他确定了三个关键目标:
生成你的规格 通过添加Kitura-OpenAPI依赖
1 .package(url: "https://github.com/IBM-Swift/Kitura-OpenAPI.git" , from: "1.1.1" ),
运行后
http://localhost:8080/openapi
1 2 3 4 5 6 7 8 9 10 11 12 13 14 15 16 17 18 19 20 21 22 23 24 25 26 27 28 29 30 31 32 33 34 35 36 37 38 39 40 41 42 43 44 45 46 47 48 49 50 51 52 53 54 55 56 57 58 59 60 61 62 63 64 65 66 67 68 69 70 71 72 73 74 75 76 77 78 79 80 81 82 83 84 85 86 87 88 89 90 91 92 93 94 95 96 97 98 99 100 101 102 103 104 105 106 107 108 109 110 111 112 113 114 115 116 117 118 119 120 121 122 { "schemes" : [ "http" ] , "swagger" : "2.0" , "info" : { "version" : "1.0" , "title" : "Kitura Project" , "description" : "Generated by Kitura" } , "paths" : { "\/entries" : { "get" : { "responses" : { "200" : { "schema" : { "type" : "array" , "items" : { "$ref" : "#\/definitions\/JournalEntry" } } , "description" : "successful response" } } , "consumes" : [ "application\/json" ] , "produces" : [ "application\/json" ] } , "post" : { "consumes" : [ "application\/json" ] , "produces" : [ "application\/json" ] , "responses" : { "200" : { "schema" : { "$ref" : "#\/definitions\/JournalEntry" } , "description" : "successful response" } } , "parameters" : [ { "in" : "body" , "name" : "input" , "required" : true , "schema" : { "$ref" : "#\/definitions\/JournalEntry" } } ] } } , "\/health" : { "get" : { "responses" : { "200" : { "schema" : { "$ref" : "#\/definitions\/Status" } , "description" : "successful response" } } , "consumes" : [ "application\/json" ] , "produces" : [ "application\/json" ] } } , "\/entries\/{id}" : { "delete" : { "consumes" : [ "application\/json" ] , "produces" : [ "application\/json" ] , "responses" : { "200" : { "description" : "successful response" } } , "parameters" : [ { "in" : "path" , "name" : "id" , "required" : true , "type" : "string" } ] } } } , "basePath" : "\/" , "definitions" : { "JournalEntry" : { "type" : "object" , "required" : [ "date" , "emoji" ] , "properties" : { "id" : { "type" : "string" } , "emoji" : { "type" : "string" } , "date" : { "type" : "number" } } } , "Status" : { "type" : "object" , "required" : [ "status" , "details" , "timestamp" ] , "properties" : { "status" : { "type" : "string" } , "details" : { "items" : { "type" : "string" } , "type" : "array" } , "timestamp" : { "type" : "string" } } } } }
此代码段的顶部表示你正在查看路径/entries的GET路由。 三个子节点描述了这条路线:
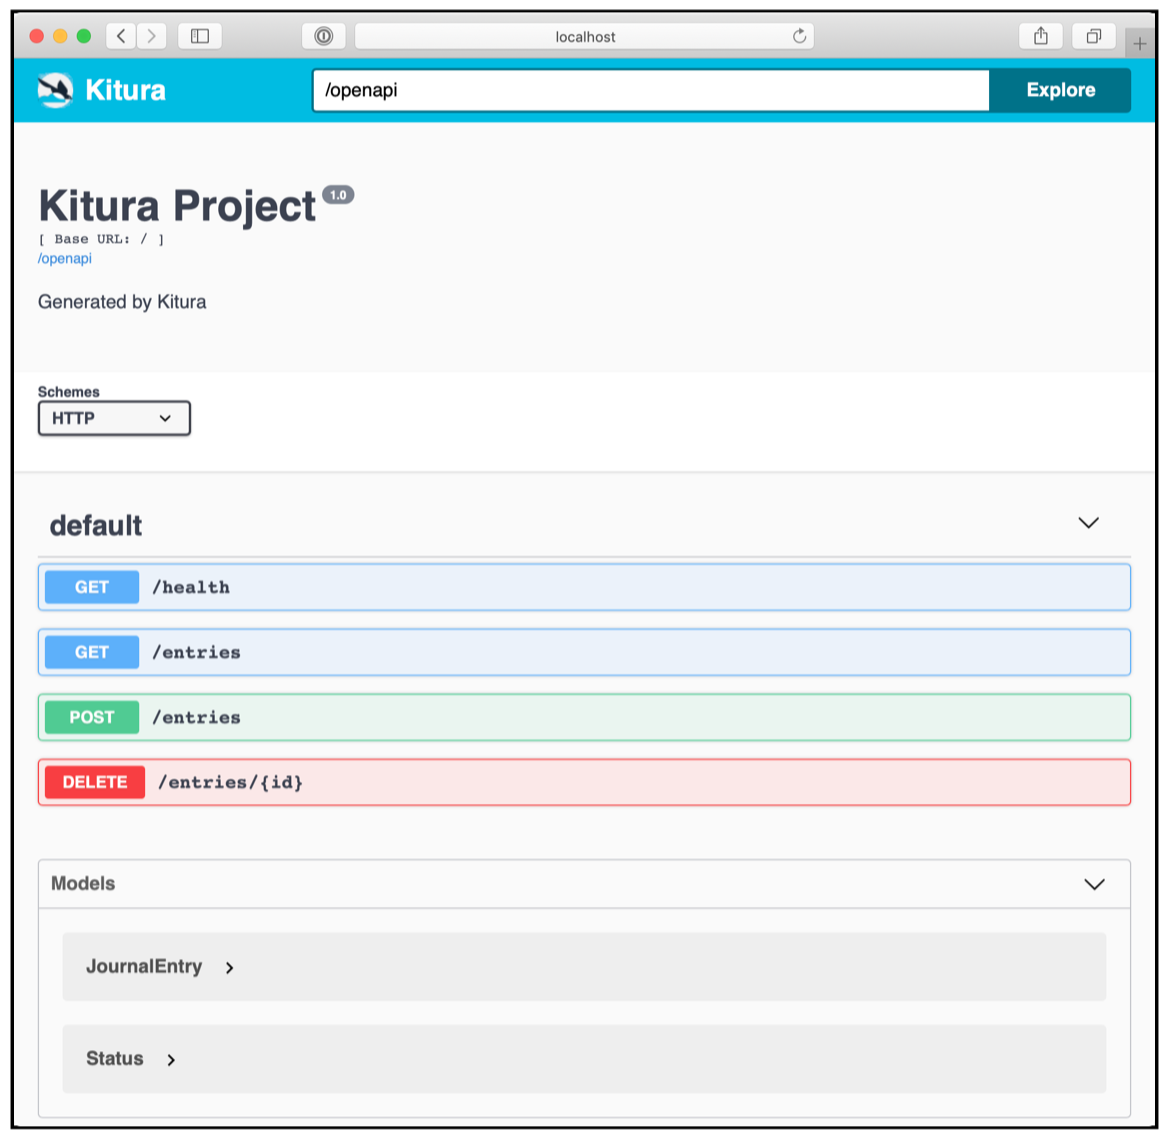
使用Kitura OpenAPI UI 同步生成的还有UI调试界面
http://localhost:8080/openapi/ui
这对于你需要进行快速而肮脏的测试的情况非常有用 - 或者如果你无法让顽固的队友相信这个模块真的有用!
为你的iOS应用生成SDK 终端运行,即可生成SDK,一个功能齐全的Swift SDK,可以处理与此特定服务器的所有网络通信。
1
2
3
4
5
6
docker pull swaggerapi/swagger-codegen-cli docker run --rm -v ${PWD} :/local swaggerapi/swagger-codegen-cli langs mkdir GeneratedSDK touch specification.json // 复制http://localhost:8080/openapi的内容到specification.json docker run --rm -v ${PWD} :/local swaggerapi/swagger-codegen-cli generate -i /local/specification.json -l swift -o /local/GeneratedSDK
在实践中,这不仅可以节省时间并让你快速启动和运行,还可以节省错误,并且对于那些没有(喘气)在Swift工作的人来说尤其有用!

